

Assembling Retractable Banner Stands Correctly
Posted by Deeder Dandenhorf on May 22nd 2026
Assembling Retractable Banner Stands Correctly
You’ve invested in a quality retractable banner, your event is hours away, and suddenly the stand won’t cooperate. Assembling retractable banner stands correctly is one of those skills that looks simple until you’re on the trade show floor with a crooked display and a line of prospects walking past. Poor setup affects more than aesthetics. It signals to potential customers whether your brand is organized and professional or rushed and unprepared. This guide covers everything you need: the tools to have ready, a clear step-by-step process, common mistakes to avoid, and maintenance tips that protect your investment long after the event ends.
Table of Contents
- Key Takeaways
- Tools and materials needed before assembly
- Step-by-step guide to assembling a retractable banner stand
- Common mistakes to avoid when setting up banner stands
- Proper maintenance and storage after your event
- My honest take on getting banner setup right
- Get the right banner stand for your next event
- FAQ
Key Takeaways
| Point | Details |
|---|---|
| Prep before you start | Lay out all components on a flat, clean surface before beginning assembly to avoid missing parts mid-setup. |
| Pull the banner slowly | Raise the banner graphic smoothly and without jerking to prevent stretching and spring damage. |
| Lock every pole section | Confirm each telescopic pole clip is locked before attaching the banner top bar to prevent collapse. |
| Store it retracted | Always fully retract and case the banner after use to protect the graphic and internal spring mechanism. |
| Replace graphics, not stands | Swapping printed graphics costs far less than buying a new stand and takes under five minutes. |
Tools and materials needed before assembly
Before you touch a single component, take two minutes to organize your workspace. Rushing past this step is how parts get lost and banners get damaged before the event even starts.
Most retractable banner stand packages include everything you need for setup. Here is what you should find inside the carrying case:
- The base unit with the retractable spring mechanism inside
- One or two telescopic support poles (depending on the model)
- A top bar or bungee cord attachment for the banner’s upper edge
- The printed banner graphic, already loaded into the base
- A carrying bag or hard case for transport
Beyond the package contents, have these items ready before you begin:
- A flat, stable surface to work on (a carpeted floor works well and protects the base)
- A clean, dry cloth to wipe down components if needed
- A small level if you want to verify the display is perfectly upright after setup
| Item | Purpose |
|---|---|
| Telescopic support pole | Holds the banner at the correct display height |
| Top bar or bungee cord | Secures the upper edge of the banner graphic |
| Base unit | Houses the spring mechanism and anchors the display |
| Carrying case | Protects all components during travel and storage |
| Clean cloth | Wipes dust or smudges from the base and pole before display |
One thing worth knowing: retractable banners weigh 10 to 20 lbs and fit inside standard airline carry-on cases, which makes them genuinely travel-friendly for event professionals who move between venues.
Pro Tip: Before your first event, do a full practice assembly at home or in the office. Familiarity with your specific model means you can set up confidently in under two minutes when it counts.
Step-by-step guide to assembling a retractable banner stand
The good news is that most retractable banner stands assemble in under two minutes without any tools. Follow these steps in order and you will have a stable, professional display every time.
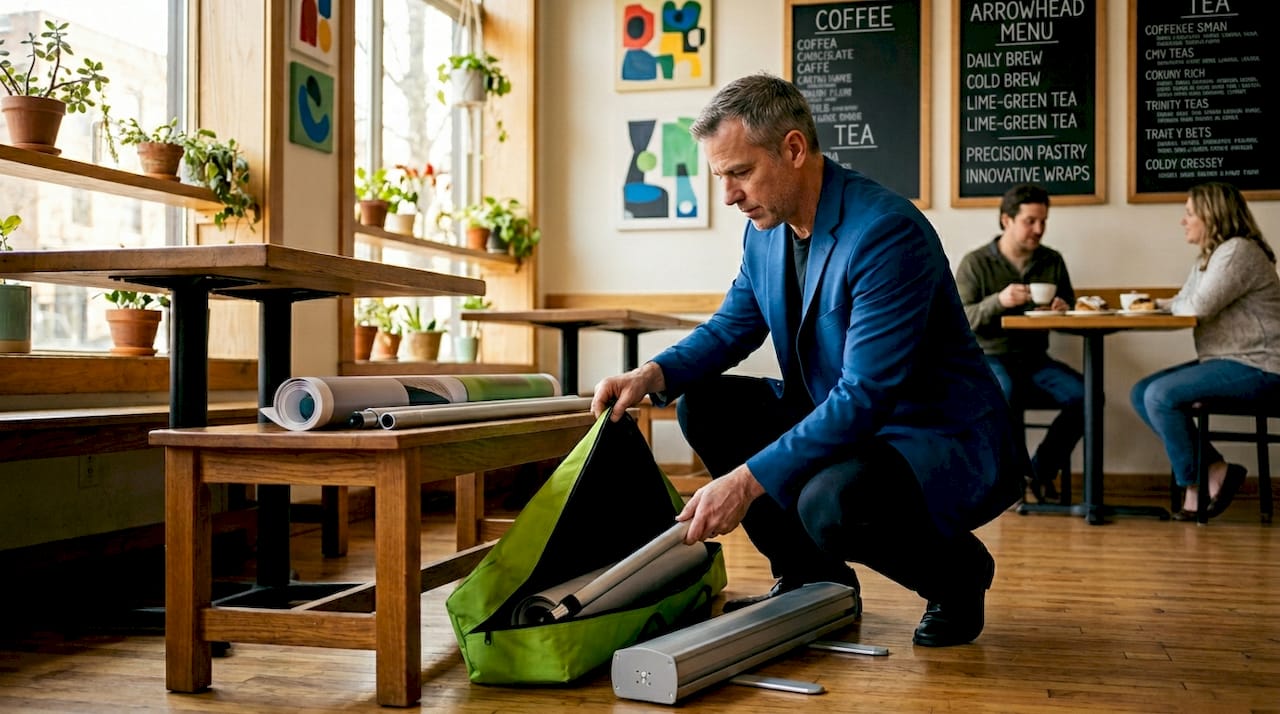
Step 1: Unpack and inspect all components. Remove everything from the carrying case and lay it on a flat surface. Check that the base, pole sections, and top bar are all present and undamaged. Look for any visible cracks in the base or bent pole sections before proceeding.
Step 2: Position the base correctly. Set the base on a flat, level floor with the retractable slot facing upward. If your model has stabilizing feet, position the feet perpendicular to the base for maximum stability. This single adjustment significantly reduces the chance of your display tipping over during a busy event.
Step 3: Assemble the telescopic support pole. Connect the pole sections together by sliding them into each other and locking each joint. Open and close the clip locks to adjust the pole height to match your banner’s dimensions. Most standard banners display at 80 to 92 inches tall, so set the pole accordingly before inserting it into the base.
Step 4: Insert the pole into the base. Slide the bottom of the assembled pole into the center socket of the base unit. You should feel it seat firmly. Give it a gentle tug to confirm it is secure before moving on. A pole that wobbles at this stage will cause alignment problems later.
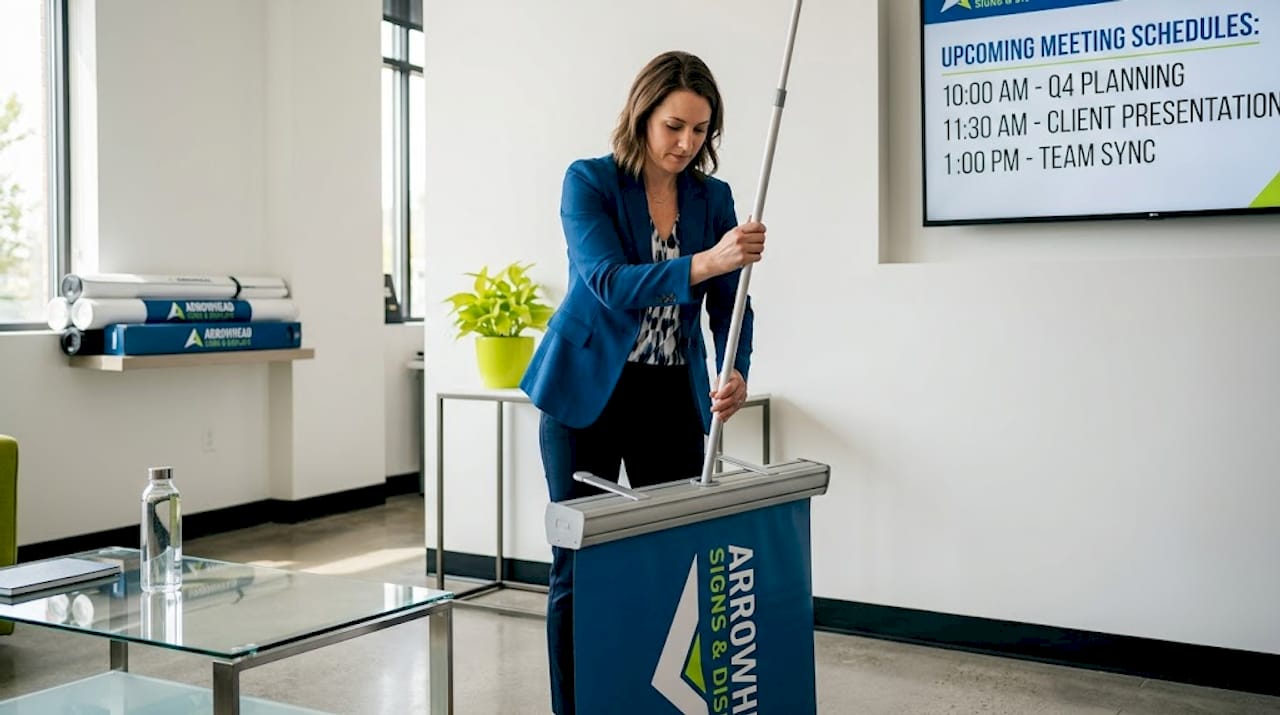
Step 5: Pull up the banner graphic slowly. Locate the top edge of the banner where a small tab or hook is attached. Grip that tab and raise the banner slowly and smoothly to avoid stretching the graphic or stressing the internal spring. Never yank or snap the banner upward. Think of it as a steady, controlled pull rather than a quick tug.

Step 6: Attach the banner to the top bar. Once the banner is fully extended, connect the top tab or hook to the top bar or bungee cord that sits at the top of your pole. The banner should feel taut but not strained. If it looks slightly loose, adjust the pole height upward by one notch.
Step 7: Check alignment and tension. Step back and look at the display from a few feet away. The banner should hang flat with no visible wrinkles or bowing. Check that the base is sitting level and that the pole is straight. Minor adjustments to the pole height or foot position can fix most alignment issues immediately.
Step 8: Final stability check. Give the base a light push from the side to test its stability. If it rocks, recheck the foot position and make sure the pole is fully seated in the base socket. A properly assembled stand will feel solid even when bumped lightly.
Pro Tip: If you are setting up on a smooth hard floor like polished concrete at a convention center, place a small non-slip mat under the base. This prevents sliding during high-traffic moments without any additional hardware.
Common mistakes to avoid when setting up banner stands
Even experienced event professionals make these errors. Knowing them in advance saves you from a damaged banner or an embarrassing display at a critical moment.
- Pulling the banner too fast. Snapping the graphic upward is the most common cause of spring damage and graphic tears. Over-tensioned springs are the most frequent failure point in retractable stands, and most of that damage comes from aggressive pull-ups.
- Forcing the pole lock clips. If a clip does not engage smoothly, the pole sections may not be aligned correctly. Forcing them risks cracking the clip housing. Back the sections out slightly, realign, and try again.
- Skipping the base stability check. Placing the base on uneven flooring without checking the feet is a setup for a tipped display. Always verify the base is level before pulling up the banner.
- Over-tensioning the banner. Setting the pole too high for the banner’s actual height puts excessive stress on both the graphic and the spring mechanism. Proper tension and slow retraction prevent spring wear and extend the life of your display significantly.
- Retracting too quickly after the event. Fast retraction is just as damaging as fast extension. Guide the banner back into the base slowly with one hand while holding the base steady with the other.
When something feels forced during assembly, stop. Retractable banner stands are designed to go together with minimal resistance. If you are straining, something is misaligned. Back up one step and check before continuing.
Pro Tip: Keep a small checklist photo on your phone showing each assembled stage of your specific banner model. When you are setting up at 6 a.m. before a trade show, that visual reference is worth more than any written instruction.
Proper maintenance and storage after your event
How you care for your banner stand between events determines how long it looks professional and performs reliably. Neglecting storage is how wrinkles, spring failures, and base cracks happen.
After each event, follow this approach. Retract the banner slowly and steadily, guiding it back into the base with controlled pressure. Wipe down the base and pole sections with a clean, dry cloth to remove dust, fingerprints, and any debris from the event floor. Disassemble the pole sections and store them inside the carrying case alongside the base.
| Maintenance practice | Benefit |
|---|---|
| Slow, guided retraction | Prevents spring wear and graphic creasing |
| Wiping down components | Removes abrasive particles that scratch the base and pole |
| Storing in the carrying case | Protects the graphic from UV exposure and physical damage |
| Keeping the case upright | Prevents pressure on the spring mechanism during storage |
| Replacing graphics when faded | Maintains brand quality without replacing the entire stand |
On the topic of graphic replacement: swapping a printed graphic costs $75 to $150 compared to $200 to $400 for a new stand, and the swap takes under five minutes without tools. If your messaging changes or your graphic fades after heavy use, replacing just the print is the smarter move.
Pro Tip: Store your banner case in a temperature-controlled space. Extreme heat warps the base and degrades the vinyl graphic faster than normal use ever would. A climate-controlled storage room or office closet is ideal.
My honest take on getting banner setup right
I’ve watched a lot of event setups go sideways, and the pattern is almost always the same. Someone skips the practice run, rushes the pull-up on the day of the event, and ends up with a crooked or damaged display right when it matters most. In my experience, the brands that consistently show up with sharp, professional displays are not using better equipment. They are using the same equipment more carefully.
What I have found is that correct assembly is less about technical skill and more about slowing down. The entire process takes under two minutes when done right. That timeline does not change if you rush it. You just add risk. I have seen stands tip over because nobody checked the foot position, and I have seen graphics tear because someone yanked the banner upward like they were pulling a window shade.
My honest recommendation for anyone buying a retractable banner stand for the first time: do two full practice assemblies before your first event. The second time will feel completely different from the first. You will move through the steps with confidence instead of hesitation, and that confidence shows in the final display.
For frequent travelers, I would also prioritize stands with hard-shell carrying cases over soft bags. The extra protection for the base unit is worth the slight increase in weight, especially if you are checking the case as luggage or stacking it in a cargo van with other event materials.
— Dan
Get the right banner stand for your next event
If you are ready to invest in a display that sets up quickly, travels well, and makes your brand look sharp at every event, Arrowheadsigncompany has you covered.
Arrowheadsigncompany offers a full range of retractable banner stands and custom signage built specifically for event professionals and small business owners. Their products feature replaceable graphic cartridges, adjustable telescopic poles, and durable bases designed for repeated use across trade shows, expos, and promotional events. With most orders shipped within two business days and direct delivery available throughout Arizona, getting a professional display ready for your next event has never been more straightforward. Browse their catalog and find the stand that fits your event goals.
FAQ
How long does it take to assemble a retractable banner stand?
Most retractable banner stands assemble in 30 to 60 seconds without any tools. With a little practice, the full setup from unpacking to finished display takes under two minutes.
What is the most common mistake when setting up a retractable banner?
Pulling the banner graphic upward too quickly is the most frequent error. Fast pull-ups stress the internal spring and can tear the graphic. Always raise the banner slowly and smoothly for a safe, damage-free setup.
How do I fix a banner that looks crooked or uneven after setup?
Check that the stabilizing feet are positioned perpendicular to the base and that the pole is fully seated in the base socket. Adjusting the telescopic pole height by one notch up or down usually corrects tension and alignment issues.
How should I store a retractable banner stand between events?
Retract the banner slowly, wipe down all components, disassemble the pole, and store everything in the original carrying case kept upright in a temperature-controlled space. This protects both the graphic and the spring mechanism from damage.
When should I replace the graphic instead of buying a new stand?
Replacing just the graphic costs $75 to $150 versus $200 to $400 for a new stand. If the stand hardware is still in good condition and only the print is faded or outdated, a graphic swap is the practical and cost-effective choice.