

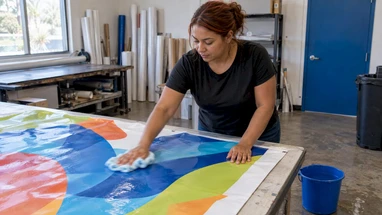
How to Clean Vinyl Banners Without Damaging the Print
Posted by Deeder Dandenhorf on Nov 18th 2026
How to Clean Vinyl Banners Without Damaging the Print

The safest way to clean a vinyl banner is the simplest one: lay it flat, wipe it with a soft cloth and lukewarm water with a few drops of mild dish soap, rinse with clean water, and dry it completely before you roll it. Skip abrasive pads and strong solvents, because the printed surface is the part of the banner your customers actually see. This guide walks you through the full routine, from the first wipe to storage, so your banner looks as sharp at its tenth event as it did at its first.
We print vinyl banners for small businesses, exhibitors and event planners every week, so the routine below is written for people who need a banner to look good on a specific day, not for people restoring antiques.
TL;DR
- Use lukewarm water, a few drops of mild dish soap and a soft cloth or sponge. Rinse with clean water and let the banner dry fully.
- Keep away from abrasive scrubbers, petroleum-based cleaners and harsh solvents. Gentle, flat, top-to-bottom wiping protects the print.
- Treat stains early, work from the outside of the mark inward, and rinse the spot afterward.
- Roll the banner loosely with the print facing out, and store it somewhere dry and temperature-stable.
- Need a fresh banner before your next show? Most of our products ship within two business days.
Table of Contents
- Why a clean banner is worth the ten minutes
- What you need before you start
- Step-by-step: how to clean a vinyl banner
- Removing stains without hurting the print
- Getting creases and wrinkles out
- Drying and storing a clean banner
- How often should you clean?
- Common mistakes to skip
- When a new banner is the smarter move
- Need a fresh banner before your next event?
- Our perspective: care is part of the design
- FAQ
- Sources
Why a clean banner is worth the ten minutes
A banner is often the first thing a visitor sees from across a show floor, a storefront or a festival lane. Dust, road film, pollen and finger marks dull the colors of your logo and make the whole display look tired. A banner that is cleaned briefly after each use stays brighter and gives you more events out of the same print.
Vinyl is a good material for this job. It is a coated, water-resistant surface, so plain water and a gentle cleaner handle most dirt without trouble. That is why a cleaning routine for vinyl is short and does not need special products. If you want to know more about how long a printed banner typically stays in good shape, our guide on how long vinyl signage lasts covers it in detail.
What you need before you start
You probably have everything in your kitchen or garage already:
- A clean, flat surface larger than the banner section you are working on: a clean floor, a large table or a patch of driveway you have swept first.
- A bucket of lukewarm water. Hot water is not needed and is best avoided.
- Mild dish soap, with no bleach or degreasing additives.
- Two or three soft microfiber cloths or a soft sponge.
- A garden hose with a gentle setting or a second bucket of clean rinse water.
- A lint roller for dry dust on banners that are only lightly dirty.
- A dry towel or clean rags for drying.
What to leave in the cupboard: steel wool, scouring pads, stiff brushes, and cleaners with solvents or petroleum distillates. These can scratch the print layer, leave haze or dull the finish. Heavy pressure washing is also best left alone, since a hard jet can lift edges and stress grommets and hems.
Step-by-step: how to clean a vinyl banner
1. Take it down and check it
Remove the banner from its stand, frame or fence ties. Cleaning a banner while it is hanging tends to leave drips and streaks, and you cannot see the whole surface. Lay it flat with the printed side up, then look over the hems, grommets (the metal rings along the edges) and seams for loose stitching or tearing. Note any problem spots now so you do not make them worse while wiping.

2. Remove loose dust first
Run a dry microfiber cloth or a lint roller lightly over the surface. Dry dust mixed with water turns into a gritty paste, and grit is what scratches. Even a quick dry pass makes the wet clean far gentler on the print.
3. Mix a mild soap solution
Fill a bucket with lukewarm water and add just a few drops of mild dish soap. You want barely sudsy water. More soap does not clean better, it only leaves a film that attracts dust and takes longer to rinse.
4. Wipe in sections, top to bottom
Dip a soft cloth, wring it so it is damp rather than dripping, and wipe the banner in gentle, overlapping strokes. Work in one section at a time, from the top edge toward the bottom. Light, even pressure is enough. If a spot does not shift in a pass or two, do not press harder. Move to the stain steps below.
5. Rinse thoroughly
Soap left behind dries into streaks and a tacky layer that collects dirt again. Rinse with a second cloth and clean water, or a gentle hose spray, also moving top to bottom. Pay attention to the hems and around the grommets, where soapy water likes to hide.
6. Dry it completely
Blot the surface with a clean towel, then let the banner air dry flat or hang it in the shade with space around it. Do not roll or fold it while any dampness remains. Trapped moisture is how mildew starts, and we cover that below. Direct sun on a wet banner can leave spots and water marks, so a shaded, ventilated spot is better.
Removing stains without hurting the print
Most marks on event banners come from a short list: grease or food splashes, tape residue, scuff marks from transport, bird droppings, tree sap and mildew. The approach is the same for all of them: start with the gentlest option, and work up only if you need to.
| Mark | Gentle first step | If it remains |
|---|---|---|
| Dust, pollen, road film | Dry microfiber or lint roller, then mild soap and water | Repeat the wash with fresh solution |
| Grease or fingerprints | Soap solution on a soft cloth, held on the spot for a few seconds | Wipe again, rinse well |
| Bird droppings, sap | Soften with a damp warm cloth for a minute, then lift gently | Wash the area with soap solution and rinse |
| Tape or sticker residue | Rub lightly with a soft cloth and soapy water | Peel slowly by hand, rather than scraping with a blade |
| Scuffs from transport | Wipe with soapy water | Accept a faint mark rather than scrubbing, since scrubbing can dull the finish |
| Mildew spots | Wash with mild soap solution and rinse | Dry fully in the shade and review how it was stored |
Two rules for every stain. First, deal with it soon: a fresh mark lifts far more easily than one that has baked in the sun for a month. Second, work from the outside of the mark inward so you do not spread it into a larger ring.
If you decide to use anything stronger than dish soap on a stubborn spot, try it first on a hidden corner or a hem area, wait for it to dry and look at the result in daylight. Keep the product to a small, dabbed area and rinse it away afterward. Avoid petroleum-based or abrasive cleaners entirely, since they are the ones most likely to cloud or lift the print.
Getting creases and wrinkles out
Banners that spent a few weeks folded in a box often show hard creases. The best fix is time and gentle weight, not heat.
- Unroll or unfold the banner on a clean, flat floor with the print facing up.
- Place a few clean, smooth objects on the corners, such as books wrapped in a clean cloth.
- Leave it in a room at a comfortable temperature for a day or two. Mild warmth helps vinyl relax, so a sunny indoor room works better than a cold garage.
- For a stubborn crease, hang the banner from a top rail so gravity pulls it straight over a few days.
Avoid ironing, heat guns and hair dryers held close to the print. Vinyl responds to heat by stretching or warping, and a damaged print is much harder to fix than a crease. Rolling the banner properly in the first place prevents most creases, which is the next topic.
Drying and storing a clean banner
Storage is where banners are either protected or quietly ruined. A banner that is clean and bone dry before it goes away will come out ready to use.
Roll, do not fold. Roll the banner loosely around a tube with the printed side facing out, which keeps the print from creasing against itself. A wide-diameter tube is better than a narrow one, and Devon Self Storage’s guide to storing trade show displays recommends rolling around a wide tube and storing banners horizontally, with no heavy items stacked on top.

Keep temperature steady. The same guide notes that temperature swings can warp vinyl banners and recommends climate-controlled storage for anything stored longer than a few weeks. An attic or a parked truck in summer is a poor home for a banner.
Stay dry. Never store a banner that is even slightly damp. A closet shelf, a sturdy shipping tube or a lidded bin in a dry room is ideal.
Plan the next use. If you reuse banners at multiple events, think about storage as part of your trade show planning. A practical overview of trade show booth design shows how rolling and positioning marketing materials correctly saves time and cost between shows. Our own post on trade show graphics storage goes through crating and protecting graphics for travel.
How often should you clean?
There is no universal calendar, but a few habits work well:
- Indoor banners: a dry wipe or lint roll before each event, and a full wash once or twice a year or when marks appear.
- Outdoor banners: a quick rinse and soft wipe every month or so, and sooner after dusty, rainy or windy periods. Banners near busy roads, construction or industrial areas collect grime faster.
- Trade show banners: wipe down after every show, before you roll them. Booth floors, hands and transit add marks you will not notice until the next show.
Outdoor banners also live with sun, wind and rain, so cleaning goes hand in hand with proper mounting. Our posts on how weather affects vinyl banners and whether vinyl banners are durable enough outdoors explain what to expect and how to hang them well.
Common mistakes to skip
- Scrubbing hard. Pressure does not remove dirt faster, it grinds it into the surface. Use more time and a second pass instead.
- Using too much soap. The residue pulls in dirt and shows as haze.
- Cleaning in direct midday sun. Water and soap dry too quickly and leave marks.
- Rolling a banner damp. This is the most common cause of musty smells and spotting.
- Folding the print inward on itself in a box. Creases and ink transfer follow.
- Cleaning while hanging. You miss areas and get drips down the design.
When a new banner is the smarter move
Cleaning keeps a good banner looking its best, and it also helps you notice when a banner has reached the end of its run for an important event. If edges are fraying, grommets are pulling through, or the colors have changed from long outdoor exposure, a fresh print makes a stronger first impression than any amount of wiping. That decision is easiest when you know a replacement can arrive before your event date.
If you are comparing options for a new print, our guide to choosing vinyl banners for trade shows explains sizes, finishing and placement.
Need a fresh banner before your next event?
At Arrowhead Sign Company, most products ship within two business days, and in Arizona we can deliver directly to your venue. Our printed vinyl banners come with a standard banner layout for $35, and Next Day Air is available for $10 when your date is close. You can see the range on our vinyl banner page, and pair a banner with a banner stand or an outdoor banner frame for a clean, tidy setup.
If your booth needs more than one banner, our trade show products and displays cover retractable banners, tension fabric displays and pop up tents, so the whole look arrives together.
Our perspective: care is part of the design
We think of a banner as a working piece of your marketing, not a one-time print. The brightest logo in the world loses its pull if it is dusty, creased or speckled with mildew by the time people see it.
That is why we keep care advice simple. Soft cloth, mild soap, lukewarm water, a good rinse and a fully dry roll. Nothing about it needs special products, and it takes less time than setting up your booth.
What we focus on is making the banner easy to look after in the first place and easy to replace when your schedule demands it. Fast turnaround, with most products shipping within two business days, means you are never stuck with a tired banner because the next show is close. And for Arizona customers, delivery straight to the venue takes one more thing off your list.
Care for your banners, plan your storage, and when it is time for a new look, we will get it to you quickly.
Dan
FAQ
What is the best thing to clean a vinyl banner with?
Lukewarm water with a few drops of mild dish soap, applied with a soft cloth or sponge, is the best everyday choice. Rinse with clean water and dry the banner completely. This handles dust, fingerprints and most road film without risk to the print.
Can I use a pressure washer on a vinyl banner?
We recommend against it. A strong jet can stress the hems, grommets and edges, and can roughen the printed surface. A garden hose on a gentle setting, or a cloth and bucket, cleans just as well for ordinary dirt.
How do I clean a vinyl banner that is hanging outdoors?
Taking it down is best, because you can see the whole surface and avoid drips. If that is not possible, rinse it with a gentle hose, wipe with a soft cloth dampened with mild soapy water from top to bottom, and rinse again. Do this in the shade and let it dry before the wind whips it around.
How do I stop a banner from getting mildew?
Make sure it is fully dry before you roll it, then store it in a dry place at a steady temperature. Rolling it loosely with the print outward and keeping it off damp floors also helps.
How do I flatten a vinyl banner after storage?
Lay it flat, print up, in a room at a comfortable temperature and weigh the corners with smooth, clean objects for a day or two. Hanging it from a top rail also lets gravity pull out creases. Avoid direct heat from irons or heat guns.