

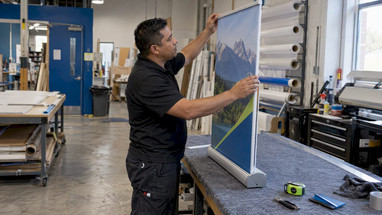
How to Replace Retractable Banner Graphics
Posted by Deeder Dandenhorf on Nov 3rd 2026
How to Replace Retractable Banner Graphics

You can replace the graphic on most retractable banner stands and keep the hardware you already own. The job comes down to four steps: confirm your stand takes a replacement, measure the old graphic, order a print that matches, and swap it with the spring locked. Done carefully, it takes about as long as a coffee break and gets your booth ready for the next event.
This guide walks through each step, from compatibility to storage, and explains when it makes more sense to replace the whole stand.
TL;DR
- Most retractable stands are reusable, so a new print-only graphic is usually all you need to update your message. (source)
- Measure the visible graphic width and height, check the top rail, and note the stand’s name or model before you order.
- Always lock the spring mechanism before you detach the old graphic, and never let the banner snap back unattended.
- Replace the stand itself only when the base, pole or spring is damaged, or when your display needs have outgrown it.
- Order early: print-only replacements are quick to produce, and most of our products ship within two business days.
Table of Contents
- Can you replace the graphic on your stand?
- How to check compatibility and measure
- Preparing the artwork for a replacement print
- How to remove and install the new graphic
- Fixing a banner that retracts badly or gets stuck
- What does a replacement graphic cost?
- When to replace the stand instead
- Storing and protecting your replacement graphic
- Order your replacement graphic from Arrowhead
- FAQ
- Sources
Can you replace the graphic on your stand?
In most cases, yes. A retractable banner is built in two parts: the hardware (the base cassette with its spring, the pole and the top bar) and the printed graphic that rolls inside it. The hardware is the durable part. The graphic is the part that changes when your offer, logo, event or season changes. Most retractable stands are reusable, and the graphic can be swapped to update messaging without buying a whole new stand.
There are two broad types of stand, and the difference matters when you order:
- Stands designed for easy graphic changes. The graphic attaches to the roller with a strip or clip system, and the top rail can be moved from the old print to the new one.
- Stands where the graphic is fixed to the roller with adhesive or a permanent leader strip. These can often still be re-skinned, but the swap is fussier, and some owners find it simpler to start with a fresh unit.
If you bought your stand from us, the product page will name the model and size. If you did not, you can still match it by measuring, which is covered next.
How to check compatibility and measure
A replacement graphic has to match the hardware in width, height and attachment style. The simplest route is to tell your printer the stand’s name or type if you know it. If you do not, measure the graphic’s width and height and look at the top rail.

Here is a checklist you can finish in five minutes.
What to measure
- Visible width. Extend the banner and measure the printed surface from edge to edge in inches. Common stand widths run in the low-to-mid 30s of inches for economy models, and wider for premium ones.
- Visible height. Measure from the base cassette to the top bar. Print-only replacements usually include extra length that rolls into the cassette and is hidden under the top bar, so the printed length is always longer than the part you see.
- Total stand width. Measure the base cassette from end to end. Stand names often include this number, such as a 33.5 in or 36 in economy model.
- Top rail type. Note whether the rail is a clamp, a snap-on bar or a slotted profile, and whether your old graphic used tape, a j-strip or Velcro on the leader.
- Model name. Check the base for a label or sticker, or look through your original order confirmation.
Take a photo of the base, the top bar and the back of the graphic, and keep it with your order notes. When you contact a printer, those three photos answer most of the compatibility questions at once.
Sizes we list for replacement
On our site you will find print-only options for several common economy and premium sizes, so you can match a graphic to a stand you already own:
| Replacement type | Size listed | Link |
|---|---|---|
| Econo print-only vinyl | 24 in x 80 in | Econo 24 in print only |
| Econo print-only vinyl | 31.5 in x 80 in | Econo 31.5 in print only |
| Econo print-only vinyl | 36 in x 80 in | Econo 36 in print only |
| California series replacement banner | 33 in x 81 in | California series 33 in |
| California series replacement banner | 47 in x 81 in | California series 47 in |
If your measurements land between two sizes, do not guess. Send us the measurements and photos first, and we will help you pick the right fit before anything is printed.
Preparing the artwork for a replacement print
A good swap starts with good artwork. A few habits save you from reprints.
- Build the file at the final size or in proportion. Large-format files are often built at a scaled-down size, so confirm the printer’s file requirements before you export.
- Keep key content out of the bottom and top zones. The bottom few inches sit close to the floor and can be hidden by tables or chairs, and the top inches tuck behind the top bar. Put your logo and main headline in the upper-middle of the visible area, where eyes land first.
- Use vector logos where you can. Vector files stay sharp at any size. Photos should be high resolution, since a small web image will look soft when stretched across six or seven feet.
- Choose a layout, not a collage. A banner is read from several feet away. One message, one image, one call to action works better than a crowded design.
- Check spelling and phone numbers twice. A typo printed on a seven-foot banner is expensive.
If you do not have a design ready, our standard banner layout service is listed at $35, which gives you a clean starting point for your message. Next Day Air shipping is listed at $10 for orders that are up against a deadline. Both are shown on our printed banners page.
How to remove and install the new graphic

Spring tension is the one real hazard in this job. The cassette holds a coiled spring that pulls the banner back into the base, and an uncontrolled retraction can pinch fingers or whip the top bar. Work on a clean, flat surface, such as a table or a clear floor, and keep your hands away from the opening of the cassette.
Step-by-step removal
- Extend the banner fully and lock it. Fully extend the banner, lock the spring mechanism with a pin or tool, then detach it carefully from the top rail and base. Many stands include a small key, pin or locking tab for this reason. Check your manual or the underside of the cassette.
- Lay the stand down. Place it on its back so the pole and cassette are stable and the graphic does not drag on the floor.
- Detach the top bar. Remove the top rail from the old graphic. It may slide off, snap off or be held by small screws. Keep every piece, since the new graphic uses the same rail.
- Release the old graphic from the leader strip. Peel the old graphic from the leader strip, which may be held with tape, a j-strip or Velcro. Work slowly so the strip itself stays intact and reusable.
Step-by-step installation
- Attach the new graphic to the leader. Line up the edge of the new print with the leader strip so it is straight across the full width. A crooked attachment is the most common reason a banner curls or drifts as it rolls.
- Reattach the top rail. Slide or clamp the rail onto the top of the new print, centered, with the print’s top edge fully seated.
- Roll the banner in by hand. While the lock is still engaged, gently roll the new graphic onto the roller, keeping the edges aligned. Check that it winds flat with no wrinkles or overlap.
- Release the lock slowly. With one hand on the top bar, remove the pin or tool and let the banner retract in a controlled way.
- Stand it up and test. Pull the banner up, hook it to the pole, and check that it hangs flat. Retract it once more to confirm it rolls smoothly.
If you are working alone, ask a second person to hold the top bar. It makes the lock-release step much safer and the alignment much easier.
Fixing a banner that retracts badly or gets stuck
After a swap, most problems come from alignment, not broken hardware. Run through these checks in order.
- The banner winds crooked or telescopes to one side. The graphic was likely attached slightly off-square. Extend it, lock it, detach the leader and reattach it, checking that the edges line up with the cassette slot.
- The banner will not retract. Look for a fold, crease or curled corner near the cassette opening. Smooth the graphic flat and try again. Also confirm that the lock pin is removed.
- The banner retracts too fast or too slowly. Tension is set at the factory for most stands. Do not try to wind or release the spring yourself. If the speed is clearly off, contact the seller for guidance.
- The leader strip peels. Replace the tape or reseat the j-strip. If the strip is damaged, ask your supplier for a replacement leader.
- The top bar sags or tilts. Recheck that the rail is fully seated and centered, and that both ends are fastened evenly.
A stuck banner should never be forced. Pulling hard on a jammed graphic can tear it or damage the roller, and a damaged roller is the point where replacing the stand starts to make more sense.
What does a replacement graphic cost?
Prices for print-only replacements depend on the size, the material and the stand type, so a single national number would be misleading. Expect the price of a print-only replacement to be well below the price of a complete stand with a graphic, because you are paying for the printed material and not for the spring cassette, pole and carry bag.
For our own products, the prices published on each listing are the ones that count. We list a standard banner layout at $35 and Next Day Air at $10, and the rest of the pricing sits on the product pages for each print-only size, so check the listing for your size before you order.
A simple way to compare your options:
| Option | What you pay for | Best when |
|---|---|---|
| Print-only replacement | The new graphic only | The stand is in good working order |
| New stand with graphic | Hardware, graphic and usually a carry bag | The stand is damaged, worn or the wrong size |
| Upgrade to a different display | A new format such as a tension fabric display | You need a larger or more premium look |
When to replace the stand instead
A new graphic cannot fix a failing stand. Consider replacing the whole unit when you see any of the following:
- The spring has weakened or failed. The banner does not return fully or hangs slack.
- The pole is bent or the sections no longer lock. A leaning banner looks careless, however good the print is.
- The cassette is cracked or dented. A damaged opening can scratch or tear every new graphic you install.
- The stand is the wrong size for your new needs. If you now want a wider display, a new stand is the cleaner route than forcing a mismatch.
- You cannot find a matching graphic. Discontinued models can be hard to match, and a current stand with a print-only refill program saves future headaches.
If you want a fresh start, browse our banner stands, or look at an economy model such as the 33 x 80 econo retractable stand. If your event calls for something bigger than a single banner, a 10 ft stretch fabric display gives you a larger canvas.
Storing and protecting your replacement graphic
You may order the new graphic days or weeks before the event. Keep it in good shape.
- Keep it in its tube or box until you install it. Do not fold a banner. Creases show in vinyl and fabric and do not always relax.
- Store flat or rolled, at room temperature. Heat can warp vinyl and cold can make it stiff, so avoid cars, garages and storage units with big temperature swings.
- Handle by the edges with clean hands. Oils and dust show up on glossy finishes.
- Retract the banner after every use. A graphic left extended collects dust and is more likely to be bumped or creased.
- Use the carry bag. Transporting the stand in its bag protects the base and prevents the pole from scratching the print.
- Keep the old graphic until the new one is confirmed. If you must return to the previous message, you will be glad you did.
When you finish an event, wipe the banner gently with a soft, dry or slightly damp cloth, let it dry fully, and then retract it.
Our take: reuse the hardware, refresh the message
We see small business owners buy a banner stand for one expo and then wonder what to do when the next show has a different offer. Our answer is nearly always the same: keep the stand, change the graphic. The hardware is built to be used again, and a print-only replacement lets you stay current without starting from zero.
That is why we list print-only options alongside complete stands, and why we focus on speed. Most of our products ship within two business days, and if you are in Arizona we can deliver directly to your venue. When a trade show date is on the calendar, that matters more than almost anything else.
Measure carefully, lock the spring, and take your time on the install. A well-fitted graphic makes your booth look like you planned it, and that is the impression you want visitors to carry away.
Dan
Oops: the signature line above must appear exactly after an empty quote line.
Order your replacement graphic from Arrowhead
If your stand is sound and your message needs a refresh, a print-only graphic is the fastest, most economical way to get back on the show floor. Pick your size from our banner stands collection, or start from our printed banners page if you want a custom layout. Most products ship within two business days, with Arizona venue delivery available and nationwide shipping for everyone else.
Not sure which size matches your stand? Send us your measurements and photos, and we will point you to the right fit. If you are planning a bigger booth, our trade show displays and quick ship displays pair well with a fresh banner.
FAQ
Can I use a replacement graphic from a different brand on my stand?
Often yes, as long as the width, height and attachment style match. Measure your current graphic and top rail, note how the leader strip is attached, and share those details with the printer. When in doubt, send photos of the base and top bar before you order.
How long does a replacement take?
Print production and shipping both count. Most of our products ship within two business days, and Next Day Air is available for $10 when time is tight. Arizona customers can also ask about direct delivery to the venue.
Do I need tools to swap the graphic?
Usually not. Some stands need a small screwdriver or Allen key for the top rail, and many include a pin or key to lock the spring. Check your stand’s manual or the underside of the cassette before you begin.
Why does my new banner curl or tilt?
The most common cause is a leader strip attached slightly off-square. Lock the spring, detach the graphic, realign it with the edges of the cassette slot and reattach it. If the top bar is not fully seated, that can also cause tilt.
Should I replace a stand that is only a few years old?
If the spring, pole and cassette still work smoothly, keep it and replace only the print. Replace the stand when it no longer retracts properly, the pole is bent, or the cassette is damaged.