


Perforated Window Vinyl for Small Businesses: Arrowhead 2 Day Ship
Posted by Deeder Dandenhorf on Sep 11th 2026
Perforated Window Vinyl for Small Businesses: Arrowhead 2 Day Ship

Perforated window vinyl works when you match the perf ratio to your goal and specify a film built for the exposure your glass gets. For most storefronts, that means a 60/40 or 70/30 ratio on a laminated cast or PET film. Your immediate next step: measure the glass, pick a perf ratio based on how much interior visibility you need, and request a sample or printed proof before you commit to a full order.
TL;DR:
- Use a perforation ratio of 60/40 for most storefront applications to balance visibility and graphic intensity, unless privacy or maximum transparency is needed.
- Laminating cast or PET films significantly extends outdoor lifespan, especially for long-term campaigns, compared to unlaminated calendered options.
- Proper surface cleaning with non-solvent cleaners and dry installation techniques are crucial to prevent bubbles, dust trapping, and early peeling.
- Pricing varies based on size, film type, lamination, resolution, and installation, with larger orders benefiting from lower per-square-foot costs.
- Design graphics with large, bold, high-contrast elements and verify proof readability at both close and distant viewing distances.
Table of Contents
- What Is Perforated Window Vinyl and How Do You Choose a Perf Ratio?
- Materials, Lamination, and Lifespan: Pick the Right Film Construction
- How Do You Install Perforated Window Vinyl Correctly?
- What Does Perforated Window Vinyl Cost, and How Do You Order It?
- How Do You Design Artwork That Reads Well Through Perforated Vinyl?
- Arrowhead’s Take on Window Perf for Small Business Storefronts
- Ready to Order? Here’s What Pairs With Your Window Graphic
- Sources
- FAQ
What Is Perforated Window Vinyl and How Do You Choose a Perf Ratio?
Perforated window vinyl is a two-layer film: a printable, opaque outer face bonded to a black or dark adhesive backing, with thousands of tiny holes punched through both layers. Stand outside, and you see the full-color graphic. Stand inside, and the dark backing plus the perforations let you see out with minimal obstruction, which is why the category is often called one-way vision film.
The holes themselves are small, typically about 1.5 millimeters in diameter, and it’s the ratio of open hole area to solid film area that determines how the film behaves. That ratio is written as a fraction, like 60/40, where the first number is the percentage of film covering the glass and the second is the percentage of open, perforated area.
Perforation ratios and what they trade off:
- 80/20 delivers maximum graphic density and color saturation, but interior visibility drops noticeably. Best for short-term promotions where the message matters more than the view out.
- 70/30 is the go-to for retail campaigns that want bold, punchy graphics while keeping a workable amount of daylight and outward visibility.
- 60/40 is the balanced default most storefronts land on. Industry guides frequently point to it as the standard choice for storefront applications where staff and customers still need to see the sidewalk.
- 50/50 maximizes see-through performance. Choose it when privacy or a subtle brand presence matters more than a loud visual.
These trade-offs come down to a simple relationship: more open area lets in more daylight and improves outward visibility, while more solid film area produces denser, more vibrant graphics, a balance outlined in detail by APM Printworks.
For a decision rule you can apply fast: pick 70/30 for a short-term storefront promotion, 60/40 for anything semi-permanent where staff work near the glass, and 50/50 for pure privacy applications like conference rooms or ground-floor offices facing a parking lot. Vehicle graphics on rear windows often use 60/40 or 70/30 ratios to balance driver visibility with graphic impact.

Materials, Lamination, and Lifespan: Pick the Right Film Construction
Film construction sets the ceiling on how long your graphic survives outdoors, and this is the decision buyers most often get wrong by focusing only on price per square foot.
Calendered vinyl is the most affordable option and works fine for short campaigns, generally topping out around one to three years outdoors depending on climate and orientation. Cast vinyl is manufactured differently, using a thinner, more dimensionally stable film that conforms better to any glass texture and holds up longer without lamination, a distinction CGX lays out clearly in its spec guide for print providers. PET-based and PVC-free films have gained ground as an option for businesses that want to avoid PVC for environmental or building-code reasons, though they typically carry a higher per-square-foot cost.
Lamination is where most of the real durability decision happens. An unlaminated perf film leaves the holes exposed, and water collects in them, which clouds the graphic, accelerates adhesive breakdown, and shortens the usable life of the install. Laminating the film closes off that pooling and improves optical clarity when viewed from outside, and in many cases it roughly doubles the film’s expected outdoor life, according to guidance from Good Guys Signs.
A practical way to think about your options:
- Short campaign, tight budget: unlaminated calendered film, expect a shorter service window.
- Long-term storefront or vehicle graphic: cast film with overlaminate for maximum life.
- Leased retail space with landlord restrictions: ask about non-adhesive PET film that mounts without damaging the glass or frame, an approach CGX highlights for tenants who can’t leave adhesive residue behind.
Pro Tip: A laminated mid-grade film can often match the outdoor life of a pricier cast film. It costs more in material and labor upfront, but it may save you a second order down the line, a trade-off worth discussing with your supplier before you assume cast is always the right call, as CoolVu notes.
Before buying, request the manufacturer’s technical bulletin. Avery Dennison’s bulletin for MPI 2528 (50/50) and MPI 2728 (65/35) recommends overlamination and testing adhesion before full application, since low-surface-energy glass coatings can cause adhesion loss if you skip that step.
How Do You Install Perforated Window Vinyl Correctly?
Installation quality determines whether your graphic looks sharp for its full lifespan or starts peeling at the corners in month three. Whether you’re doing this yourself or briefing a hired installer, the sequence below is the one to follow.
Surface prep matters more than most people expect. Avoid solvent-based glass cleaners like standard ammonia-based window sprays during prep. Manufacturer guidance recommends mild soap and water for cleaning, and 85% isopropyl alcohol for oily residue or adhesive, allowing the glass to fully dry before application, a step detailed in General Formulations’ install bulletin. Most perforated films, especially laminated ones, are also designed for dry installation rather than the wet slip-and-slide method used for some other vinyl types.
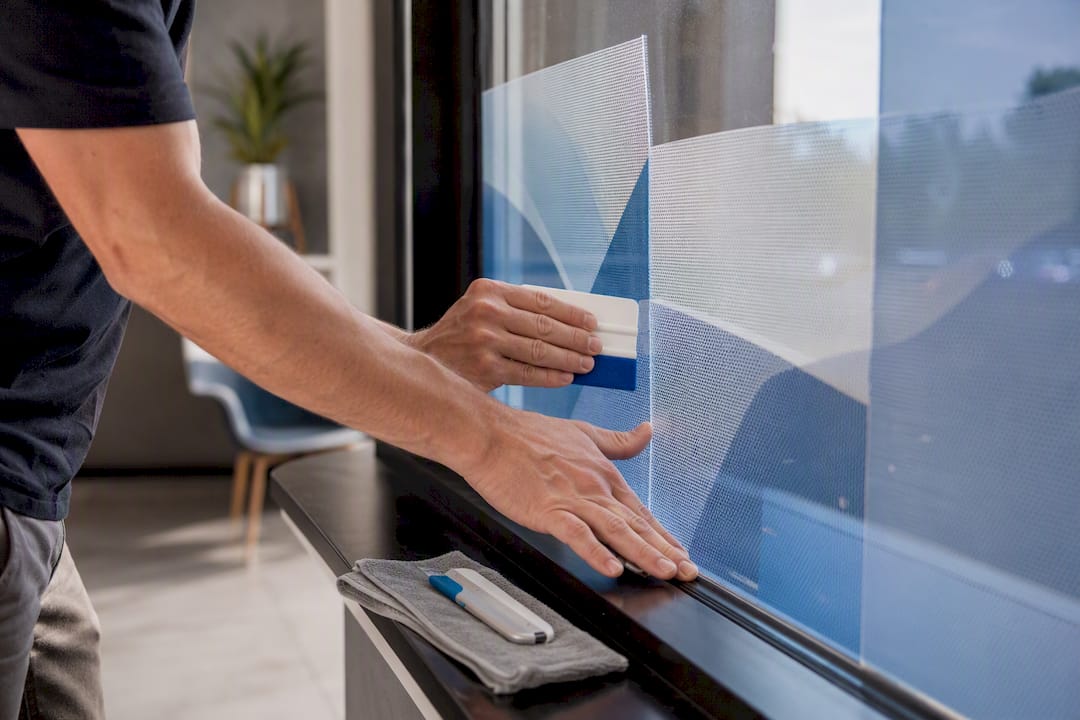
Tools you’ll want on hand: a hard card or felt-edge squeegee, stainless steel trim blades, green painter’s tape (never masking tape, which can leave residue), a spray bottle for minor adjustments, and a ladder for anything above eye level, all standard on the tool list from Tint Wiz’s install walkthrough.
Step-by-step install:
- Clean and dry the glass fully, then wipe down one more time immediately before application to catch any dust.
- Position the film dry against the glass and tape the top edge in place to create a hinge.
- Peel back the liner a few inches at a time, working from the top down.
- Use the squeegee in a firm, overlapping “plowing” motion, sometimes called the Canadian squeegee technique, pushing outward from the center to force air and moisture out toward the edges rather than trapping it in the middle.
- Work in slightly overlapping passes rather than one single swipe, checking for bubbles as you go.
- Trim excess film with a fresh blade held at a low angle to avoid scoring the glass.
- Press edges firmly with the squeegee or a felt applicator to lock down adhesion at the perimeter, where lifting starts first.
Give the adhesive time to cure before washing the window or exposing it to heavy rain or pressure washing. The most common mistake installers make is rushing the edges or skipping the second wipe-down before application, which traps dust under the film and shows up as small bumps once the light hits it.
Pro Tip: If you’re installing on a hot day, work in the shade or early morning. Warm glass makes the adhesive grab faster than you can reposition the film, and that’s how bubbles get permanently trapped.
What Does Perforated Window Vinyl Cost, and How Do You Order It?
Price per square foot swings based on five factors: total square footage, whether you add an overlaminate, the base film type (calendered versus cast or PET), print resolution, and whether you’re paying for professional installation or handling it yourself.
Vendors typically price on a tiered scale where the per-square-foot rate drops as your order size grows, and lamination adds both material and labor cost on top of the base film, a pattern reflected across retail pricing pages like Megaprint’s window perf listings. A single storefront window might run you a modest per-square-foot rate on unlaminated calendered film, while a large vehicle wrap or a laminated cast film job for a full storefront run climbs meaningfully higher per square foot, especially once professional installation labor gets added in.
Before you request a quote, have these ready:
- Exact measurements of every window or panel, including any curved or angled glass.
- Your target perf ratio (60/40 is the safe default if you’re unsure).
- Which side the film mounts on: interior or exterior, since this affects print orientation and lamination needs.
- Whether you want a laminated or unlaminated film.
- Whether you need install service or plan to apply it yourself.
- Your removal timeline. Adhesives gain tack as they age, so a promised removal date that slips by months can make later removal noticeably more labor-intensive, a cost worth pricing into your original estimate rather than discovering later.
- A request for a printed proof or physical sample before full production runs.
Getting these answers locked in before you call a supplier turns a vague quote request into a fast, accurate one.
How Do You Design Artwork That Reads Well Through Perforated Vinyl?
Perforated vinyl is unforgiving toward fine detail. Because roughly a third to half of your printable surface is literally holes, small text, thin lines, and intricate logos lose crispness once the film covers real glass.
Design for the medium, not for a screen. Use large, bold type and high-contrast color combinations, since low-contrast pairings (light gray on white, for instance) tend to disappear at driving or sidewalk distance. Skip fine gradients or delicate line art. Bump your print resolution slightly higher than you would for solid vinyl to compensate for the perforated surface eating into fine detail, and always request a printed proof rather than approving from a screen file alone, since colors and hole visibility render differently in person.
Check your proof two ways: stand close enough to see individual perforations (this is normal and expected up close), then back off to your actual viewing distance, whether that’s across a parking lot or from a passing car, and confirm the graphic still reads clean.
- Big, bold type over small or script fonts.
- High contrast over subtle color blending.
- Simple imagery over dense photographic detail.
- A physical sample check before full production.
Pro Tip: One-way visibility depends entirely on interior light levels versus exterior light. Standard perf film flips its advantage after dark, since interior lights make the graphic visible from outside at night. If your campaign needs to perform after sunset, ask about translucent or two-way films instead, or pair your window graphic with a backlit display for evening visibility.
Arrowhead’s Take on Window Perf for Small Business Storefronts
Window perf earns its reputation because it solves two problems at once: it turns a storefront into a billboard and it keeps staff from feeling like they’re working inside a fishbowl. What gets underestimated is how much the install determines your results, not just the film choice. A perfectly specified 60/40 laminated film installed with trapped dust or rushed edges looks worse at six months than a cheaper film put on correctly.
Arrowhead Sign Company - Signs, Banners and Trade Show Displays sees window perf work best as one piece of a broader storefront or event presence, not a standalone tactic. Pairing a window graphic with sidewalk signage or an outdoor banner frame extends your message beyond the glass. If you’re running a promotion tied to an event or expo booth, a stretch fabric display carries the same branding indoors.
DIY installation works fine for a single small window if you follow the dry-install method carefully. For full storefronts, vehicle fleets, or anything with curved glass, professional install protects your investment.
— Dan
Ready to Order? Here’s What Pairs With Your Window Graphic
Many sign companies ship most products within two business days, which matters when your window perf install date is locked to a promotion launch or event opening and you can’t afford a three-week wait on the signage that surrounds it.

Your window graphic rarely works alone. A Signicade Deluxe A-Frame Sidewalk Sign puts your same promotion at eye level for foot traffic that never looks up at the glass. If you’re taking the campaign to a trade show or expo booth, a 10 ft stretch fabric display carries matching branding indoors, and the Outdoor Banner Frame from The Banner Bar extends visibility to sidewalks and parking lots where perf film alone can’t reach. Before you finalize artwork on any of these pieces, our guide to proofing custom promotional signage walks through what to check before a print run locks in. If your window campaign is part of a bigger local push, a partner like Dot Xero can help tie the storefront visual into your digital and paid media presence.
Ready to move? Browse the full catalog of displays and signage and request a quote or sample proof today.
Sources
- Avery Dennison — IB610 guide: perforated window films
- Perforated window film: a spec guide for print providers — CGX
- Complete guide to window perf — CoolVu
FAQ
Can You See Through Perforated Vinyl at Night?
Standard one-way perf film depends on interior light being brighter than exterior light, so the visibility advantage often reverses after dark when interior lights are on. For campaigns that need to perform at night, ask about translucent or two-way films instead of standard perf.
How Much Does Perforated Window Vinyl Cost?
Price depends on square footage, film type, lamination, print resolution, and installation labor, with per-square-foot rates dropping as order size increases. Request a quote based on your exact measurements and perf ratio rather than relying on a generic per-square-foot estimate.
How Does Perforated Window Vinyl Work?
The film pairs a printed, opaque outer layer with a dark adhesive backing, and thousands of small holes, typically about 1.5 millimeters in diameter, let light and vision pass through from the brighter side. That’s why the graphic is fully visible from outside while people inside can still see out.
How Long Does Perforated Window Film Last?
Lifespan depends heavily on film construction and lamination: calendered film without lamination may last one to a few years, while cast film with an overlaminate can last considerably longer outdoors. Lamination also prevents water pooling in the holes, which is one of the main causes of early failure.
Should I Hire a Professional Installer or Do It Myself?
A single small window is manageable as a DIY dry install if you follow proper surface prep and squeegee technique. Full storefronts, curved glass, or vehicle wraps generally benefit from professional installation to avoid bubbles, misalignment, or trapped dust that shortens the graphic’s life.