

Exhibitors: Yard Signs for Events Shipped in Two Business Days
Posted by Deeder Dandenhorf on Sep 15th 2026
Exhibitors: Yard Signs for Events Shipped in Two Business Days
For most 10x10 and 10x20 exhibitor booths, the fastest high-impact kit is a fabric backwall, one supporting retractable banner, a printed table cover, and an A-frame or banner frame for outdoor wayfinding. That combination covers indoor visibility, portability, and entrance signage without cluttering your booth. This lineup is commonly built around the Signicade Deluxe A-Frame Sidewalk Sign, the 10 ft stretch fabric display, and the Outdoor Banner Frame - The Banner Bar. Most products ship quickly.
TL;DR:
- For most booths, a fabric backwall, a retractable banner, and a printed table cover provide high impact, portability, and visibility without clutter.
- Signage size and placement should prioritize avoiding visual clutter, with one primary backwall and open space around the display to draw visitors inward.
- Material choices vary: fabric for travel and vibrant printing, vinyl for weather resistance, and rigid panels for upright signs, depending on environment and reuse needs.
- Order your core signage at least 6 to 8 weeks before the event to avoid rush fees, and confirm venue rules on hanging and rigging early.
- Use contrasting colors, clear messaging, and proper height placement to maximize outdoor yard sign visibility and effectiveness at events.
Table of Contents
- Top Yard Signs for Events by Booth Footprint and Goal
- How Do You Choose the Right Signage for Your Event Goals?
- What Sizing and Placement Rules Prevent Signage Clutter?
- Fabric, Vinyl, or Rigid: Which Material Fits Your Signage?
- When Should You Order to Avoid Rush Fees?
- What Should You Confirm With the Venue Before Ordering?
- Specific Design Tips for Yard Signs to Maximize Visibility
- Strategies for Messaging and Calls to Action on Yard Signs
- Types of Stakes and Stands for Stability and Easy Setup
- Legal Considerations and Permits for Event Venue Signage
- Weather Considerations for Outdoor Event Signage
- How Have Signs Worked at Different Types of Events?
- What I’ve Learned Watching Exhibitors Order Signage Under Deadline
- Get Your Event Signage Ordered and Shipped This Week
- Sources
- FAQ
Top Yard Signs for Events by Booth Footprint and Goal
Your booth footprint and your goal (brand awareness, product demos, lead capture, or wayfinding) should decide which signs make the cut. Buying too many pieces creates clutter; buying too few leaves your booth invisible from the aisle. Here’s how the smart picks break down by scenario.
- 10x10 starter booth: One fabric backwall, one retractable banner, and a printed table cover. This trio sets up in minutes and travels in a single case, which matters if you’re flying to the show.
- 10x20 or modular space: A larger fabric backwall or tension fabric display anchors the back wall, with a dedicated demo-zone sign and an optional hanging ID sign if the show allows rigging.
- Outdoor or high foot-traffic events: A Signicade-style A-frame or an outdoor banner frame marks entrances, parking lots, or festival pathways where a fabric display would not survive the wind or the traffic.
On cost, portable tension fabric and pop-up displays typically run from $300 to $1,500 at the entry level, while modular and custom island exhibits climb far higher. If you exhibit three or more times a year, buying beats renting almost every time, since reusable tension fabric systems pay for themselves after two or three shows and skip the recurring rental fees entirely.
How Do You Choose the Right Signage for Your Event Goals?
Every sign should answer a question your booth visitor is already asking. A directional sign answers “where do I go?” A backwall answers “who are you and what do you do?” Match the sign to the job before you match it to your budget.
- Brand awareness goal: Prioritize a large fabric backwall with one clear headline. This is the surface people remember after they walk away.
- Product demo goal: Add a smaller support sign near the demo table that explains what’s happening, so staff don’t repeat themselves all day.
- Lead capture goal: Keep signage sparse near your check-in point so the path to the tablet or scanner stays visually obvious.
- Directional or entry goal: Use an A-frame or outdoor banner frame at the point where foot traffic decides which way to turn.
Before ordering, run through a short checklist: how many shows will you attend this year (buy vs. rent), what freight and storage costs you’ll absorb between events, and how often your graphics need refreshing for new offers or partnerships.
Pro Tip: Design one headline readable from 15 to 30 feet, and push every other detail, like specs, pricing, and taglines, onto secondary signage or handouts. Attendees decide whether to stop in about three seconds.
What Sizing and Placement Rules Prevent Signage Clutter?
Signage noise is real, and it costs you foot traffic. Three or four retractable banners lined up side by side can create a visual wall that blocks the very entry point you’re trying to invite people through. One strong backwall usually beats a crowd of smaller signs.
- Keep one primary backwall as your visual anchor, and use retractables or table signs only to support it, not repeat it.
- Preserve at least 30% of your booth’s floor area as open space, and angle greeting counters roughly 30 degrees toward the aisle to draw people in rather than square them off.
- Place headlines at eye level, roughly 60 to 66 inches off the ground, so they read clearly whether someone is standing at the aisle or already inside your booth.
For a standard 10x10, that typically means one 8x8 or 8x10 fabric backwall, one retractable at 33 inches wide, and a table cover. For 10x20 spaces, size the backwall up to roughly 10x8 and add a second support sign near the demo zone rather than duplicating the backwall message. Our guide to designing booth signage walks through message hierarchy in more detail.
Fabric, Vinyl, or Rigid: Which Material Fits Your Signage?
Material choice affects how your signage looks, ships, and survives repeated use, and each option solves a different problem.
- Fabric is photo-friendly, low-glare under booth lighting, and folds small enough to fit in a rolling case. It’s the right call for backwalls and anything that travels to multiple shows.
- Vinyl costs less and holds up to rougher handling, which makes it a solid pick for one-time events or outdoor banners exposed to weather.
- Rigid panels work best for counter signs, product labels, and anything that needs to stand upright without a stand.
Fabric graphics print through dye-sublimation, which bonds ink directly into the fibers for richer color, while vinyl typically uses solvent or UV printing for durability. Finishing options matter too: hemmed and grommeted edges suit outdoor banners, while SEG (silicone edge graphic) frames give fabric backwalls that seamless, edge-to-edge look show floors favor now.
On file specs, large-format graphics generally need at least 100 pixels per inch at full print size to stay sharp when viewed up close, well below the 300 ppi standard for print but critical to get right at booth scale.
When Should You Order to Avoid Rush Fees?
Production timelines make or break your show-day readiness, and most late scrambles trace back to one missed deadline weeks earlier.
- 6 to 8 weeks out: Finalize graphics and submit proofs for custom fabric builds or large backwalls, since these take longer to print and finish than a standard banner.
- 3 to 4 weeks out: Confirm final approvals on retractable banners and table covers, and lock in your freight labels if you’re shipping to a show venue.
- 1 to 2 weeks out: Verify electrical service, rigging approvals, and installer contact details with the show organizer directly.
- Show week: Confirm delivery tracking and pack a printed layout diagram for your installer or booth staff.
Many companies ship most products within two business days, which shortens that whole calendar considerably. Even with fast fulfillment, buyers still need to budget time for graphic approvals and show organizer paperwork, since fast shipping doesn’t skip the proofing step. Our trade show brand visibility checklist covers the show-day items worth double-checking.
What Should You Confirm With the Venue Before Ordering?
Venue rules catch more exhibitors off guard than bad graphics ever do. Before you finalize an order, confirm hanging and rigging approvals, booth height limits, and which materials the show organizer actually permits on the floor.
- Ask specifically about hanging signs, since overhead ID requires organizer approval, extra rigging charges, and early scheduling in nearly every convention center.
- Map out power, lighting, and cable runs before your signage arrives, and build lead-capture hardware mounting into the plan from the start rather than improvising it on setup morning.
- Bring spare stakes, clips, or grommets, and hand your installer a printed layout so nobody guesses where each piece goes.
Pro Tip: Many venues charge a separate rigging fee and require an approved rigger for anything suspended from the ceiling. Confirm that cost in writing before you commit to a hanging sign.
Specific Design Tips for Yard Signs to Maximize Visibility
A yard sign at an event lives or dies by contrast and distance. Dark text on a light background, or the reverse, reads faster than any color combination that relies on similar tones sitting next to each other. Keep your palette to two or three colors maximum, since a busy sign forces the eye to search instead of read.
Font choice matters more than most exhibitors expect. Bold, sans-serif lettering holds up at a distance far better than script or condensed fonts, which blur when someone glances at them while walking past at a festival pace. Size your primary text so it’s legible from at least 20 feet away, since that’s roughly where a passerby decides whether to look closer.
Logo placement should stay consistent and visible, but it doesn’t need to dominate. Put your brand mark in a corner or centered above the headline, not competing with it for attention. White space around the edges of the sign isn’t wasted space. It’s what keeps the eye focused on your message instead of overwhelmed by it.
Height and angle change everything outdoors. A sign mounted too low gets lost among tables, coolers, or crowds at ground level. Raising it to eye level, or angling it slightly toward the main walking path, does more for visibility than adding a second color or a bigger logo ever will.
Strategies for Messaging and Calls to Action on Yard Signs
One sign, one message. That’s the rule exhibitors break most often, and it’s the reason so many event signs get glanced at and forgotten. Pick a single benefit or offer and build the whole sign around it instead of trying to list everything your business does.
Your call to action needs a verb and a reason to act now. “Visit Booth 214 for a Free Demo” tells someone exactly where to go and what they get. “Learn More About Our Services” tells them nothing urgent, and urgency is what pulls feet off the main path.
Keep the CTA short enough to read in the time it takes someone to walk past at a normal pace, roughly three seconds. That means five to seven words for the action line, not a full sentence. If you’re promoting a giveaway, a demo, or a limited-time offer, name it directly rather than hinting at it.
Contact information belongs on the sign only if it’s the actual next step. A QR code linking to a signup form often converts better than a phone number, since attendees are already holding their phones and rarely want to dial anything mid walk. Test your QR code at actual sign size before printing. A code that scans fine on a screen can fail at a distance if it’s too small relative to the sign itself.
Types of Stakes and Stands for Stability and Easy Setup
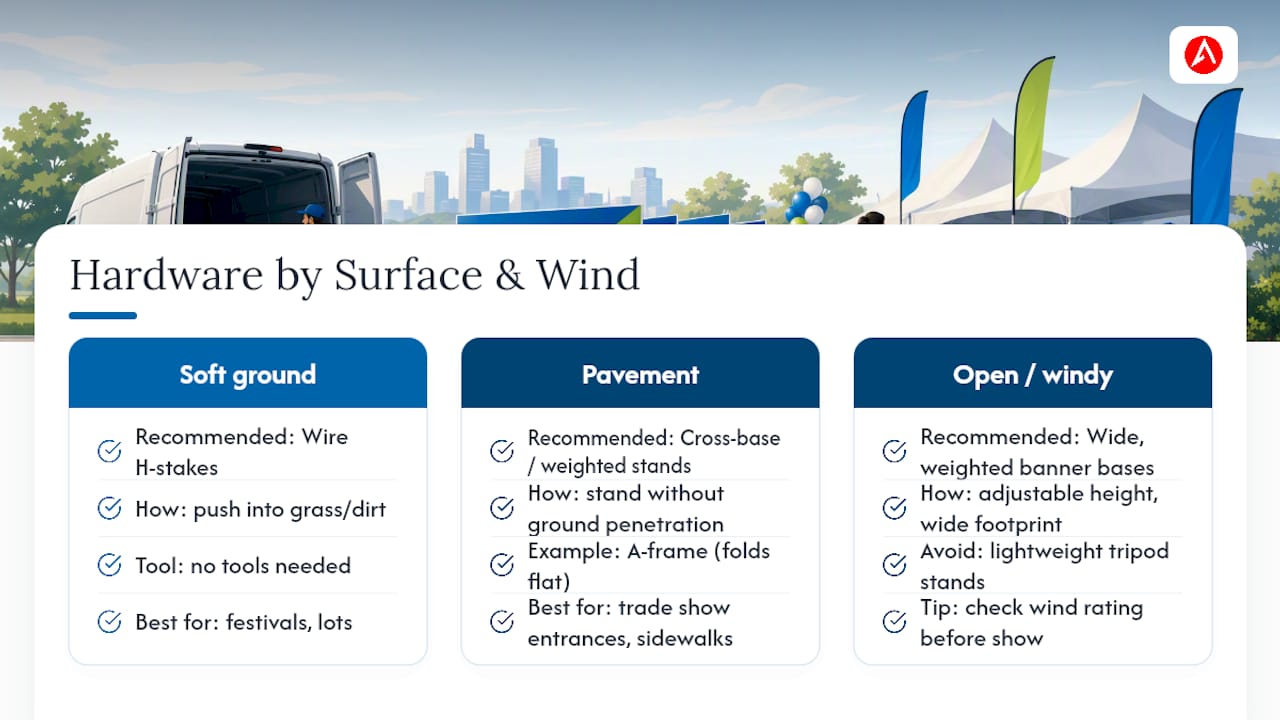
Outdoor yard signs fail for one of two reasons: the wrong stake for the ground, or a stand that can’t handle wind. Matching hardware to your venue’s surface solves most stability problems before they start.
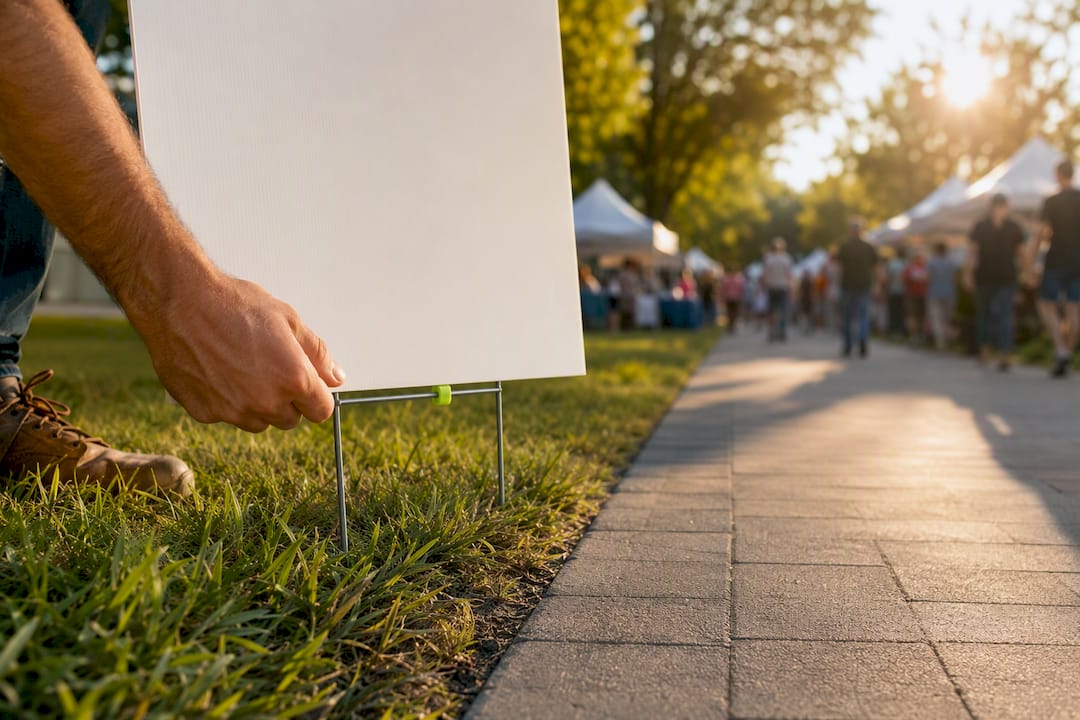
Wire H-stakes work well on soft ground like grass or dirt lots common at festivals and community events, and they push into the surface without tools. Pavement or concrete surfaces, common at trade show entrances and downtown events, need a different approach: cross-base or weighted stands that don’t rely on penetrating the ground at all.
A-frame signs like the Signicade Deluxe A-Frame Sidewalk Sign solve the pavement problem by design. The two-sided frame stands on its own weight and folds flat for transport, which makes it one of the fastest options to deploy at an entrance or along a sidewalk without staking anything into the ground.
For taller banner frames used outdoors, look for adjustable height and a wide, weighted base rather than a narrow footprint. The Outdoor Banner Frame - The Banner Bar style of stand adjusts between common heights and resists tipping better than lightweight tripod stands, which matter once wind picks up over an open parking lot or festival field.
If your event runs multiple days outdoors, check your stand’s wind rating before the show, not during it. A sign that looks stable in calm morning air can become a hazard once afternoon gusts arrive.
Legal Considerations and Permits for Event Venue Signage
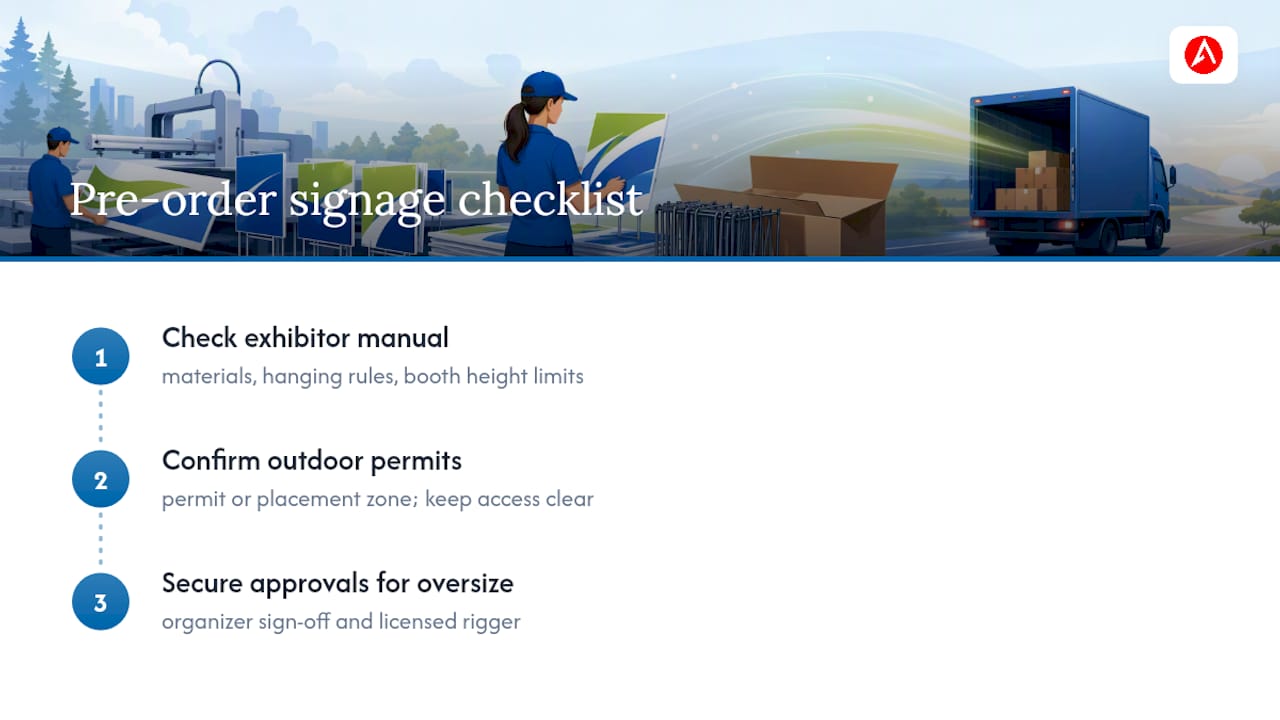
Placement rules vary by venue, and skipping this step is how signs end up confiscated on setup day. Convention centers and expo halls typically spell out permitted materials, hanging restrictions, and booth height limits in their exhibitor manual, and violating them can mean paying a labor fee to have your own sign removed.
Outdoor events add another layer entirely. Municipalities often regulate temporary signage on public property, including festivals held in parks or on city streets, and many require a permit or a specific placement zone that keeps signs clear of sidewalks and emergency access routes. Community events on private property usually fall under the property owner’s rules rather than a city permit, but it’s worth confirming in writing rather than assuming.
Trade shows add their own layer on top of any municipal rule. Show organizers typically require sign-off on anything larger than table signage, and hanging structures almost always need both organizer approval and a licensed rigger, regardless of venue.
The safest approach is asking three questions before you order anything: what does the show organizer’s exhibitor manual say about permitted signage, does the venue or municipality require a separate permit for outdoor placement, and who has final approval on hanging or oversized pieces. Getting these answers during the ordering window, not during setup, prevents a sign from becoming a problem instead of an asset.
Weather Considerations for Outdoor Event Signage
Wind, rain, and sun each attack outdoor signage differently, and the material that survives one won’t necessarily survive the others. Vinyl banners handle rain and UV exposure well, which is why they’re the standard choice for anything staked into a lawn or mounted on an outdoor frame for a multi-day festival.
Wind is the bigger threat to stability, not durability. A banner with solid, unvented material acts like a sail in a strong gust, which is why many outdoor banner frames and mesh vinyl options include small perforations that let wind pass through instead of catching it. If your event site is open, like a fairground or parking lot, ask about mesh or vented material before ordering a solid panel.
Sun exposure fades color over time, especially reds and blues, so signs left outdoors for a full weekend event will look slightly different by day three than they did at setup. UV-resistant inks slow this fade but don’t eliminate it entirely, so a sign meant for repeat seasonal use should get inspected each year rather than assumed to still look fresh.
Rain and humidity matter most for cardboard or paper-based signage, which has no place outdoors at all. Stick to vinyl, coated fabric, or weatherproof rigid panels for anything staked or standing outside, and bring a lightweight cover or storage bag for overnight breaks between multi-day events so morning dew doesn’t warp a stand’s base.
How Have Signs Worked at Different Types of Events?
Trade shows favor signage that works within tight footprints and organizer rules. An exhibitor using a fabric backwall paired with a Signicade at the aisle entrance covers both the close-range brand message and the far-off directional cue that pulls someone off the main path toward their booth.
Festivals and outdoor markets ask more of a sign’s durability and reach. A food vendor or craft booth relying on an outdoor banner frame at the entrance to their row, paired with a smaller A-frame near their actual table, gives attendees a landmark from a distance and a specific stopping point up close.
Community events, like a farmers market or a neighborhood open house, tend to reward simple wayfinding over branding. A single A-frame at a parking lot entrance pointing toward the event, with a second one marking the actual gathering point, solves the most common complaint at these events: people driving past because they couldn’t find where to turn.
Across all three settings, the pattern holds. One clear anchor sign for the main message, and one directional piece to get people there, outperforms a scattered collection of smaller signs trying to do the same job separately.
What I’ve Learned Watching Exhibitors Order Signage Under Deadline
Some signage companies build trade show displays and signage for small businesses who often place their order later than they’d like to admit, and fast shipping from a local base has revealed much about real exhibitor behavior. Customers often point to fast turnaround and reliable delivery as reasons for repeat business, suggesting exhibitors may fail more often due to timing issues than poor material or font choices.
The fix isn’t a longer checklist. It’s ordering your core signage, backwall, one support banner, and an outdoor piece, before you’ve nailed every detail of your booth strategy. You can refine messaging later. You can’t refine a sign that hasn’t arrived. [Dan’s professional background and credentials will be shared in a future update.] [Case studies showing measurable trade show results for Arrowhead Sign Company clients are in development.]
— Dan
Get Your Event Signage Ordered and Shipped This Week
Once you know which signs your booth needs, the next step is placing the order before your production window gets tight. Some signage companies ship most products quickly, with direct delivery available to local venues, helping to minimize the gap between deciding and receiving signage even on a tight schedule.

For a 10x10 or 10x20 booth, the 10 ft stretch fabric display works as your high-impact backwall. For entrances, parking lots, or lawn activations, the Outdoor Banner Frame - The Banner Bar handles outdoor wayfinding without a rigid structure to haul. For sidewalk promotions or high foot-traffic entry points, the Signicade Deluxe A-Frame Sidewalk Sign sets up in seconds and folds flat for transport. Browse the full catalog and request a quote at Arrowhead Sign Company to get your booth ready before your next event deadline hits.
Sources
- Trade Show Display Design: The Complete Booth Guide 2026
- Trade Show Booth Banner Guide 2026 | ExhibitionsVoice Blog
- Trade Show Booth Displays: The Complete Buyer’s Guide
FAQ
Should I Buy or Rent My Event Signage?
Buying makes more sense if you exhibit three or more times a year, since reusable fabric displays pay for themselves within two or three shows; renting fits a one-off event better.
How Many Banners Does a 10x10 Booth Actually Need?
One fabric backwall plus one supporting retractable banner is usually enough. Three or more retractables in a row tends to block your own entry point instead of drawing people in.
What File Resolution Do I Need for Large-Format Signage?
Most large-format graphics need at least 100 pixels per inch at full print size to stay sharp, well below standard print resolution but sufficient at booth viewing distance.
How Far in Advance Should I Order My Signage?
Order custom fabric backwalls six to eight weeks out and standard banners three to four weeks out; Arrowhead Sign Company - Signs, Banners and Trade Show Displays ships most in-stock products within two business days once artwork is approved.
Do I Need Special Permission for Hanging Signs?
Yes. Hanging or overhead signage requires show organizer approval, added rigging fees, and an approved rigger, so confirm this well before your booth’s production deadline.