

Banner Installation Methods for Exhibitors: Quick Setup Checklist
Posted by Deeder Dandenhorf on Sep 17th 2026
Banner Installation Methods for Exhibitors: Quick Setup Checklist
Retractable banners, banner stands, and tension-fabric displays each follow a short, repeatable assembly sequence: unpack, stabilize the base, connect the frame or pole, and tension the graphic. Follow the sequence and you’ll have a stable, show-ready display in minutes, not hours. The steps below cover assembly, positioning, transport, and the safety checks that keep move-in day on schedule.
TL;DR:
- Most retractable banners can be assembled in one to two minutes without tools, but rushing the pull can damage the retraction spring.
- Correct assembly requires confirming all parts, setting the base flat, and pulling the graphic smoothly to prevent tip-overs and spring wear.
- Modular tension fabric and pop-up displays demand careful tensioning and even tension across all edges for a clean look and durability.
- A comprehensive pre-show checklist should include final drawings, spare fasteners, proper shipping instructions, and enough crew members for the booth size.
- Proper packing, handling, and timely disassembly are crucial to avoid damage during transport, with disassembly done fully for longer drives and labeling crates for quick setup.
Table of Contents
- How Do You Assemble a Retractable Banner Correctly?
- Setting Up Banner Stands and Modular Frame Systems
- Assembling a Tension Fabric or Pop-Up Display
- What Should Be On Your Pre-Show Checklist?
- How Do You Retract, Clean, and Pack a Banner Without Damaging It?
- Fixing Common Problems On the Show Floor
- Securing Banners to Walls, Ceilings, and Truss Systems Indoors
- Safety Precautions and Protective Gear During Setup
- Transporting Assembled and Disassembled Banners Safely
- What Arrowhead Sign Company Sees Exhibitors Get Wrong
- Get Your Display Assembled Right, the First Time
- Sources
- FAQ
How Do You Assemble a Retractable Banner Correctly?
Every retractable banner ships with four parts: the base, a support pole, a clamp top bar, and a carrying case. Getting the sequence right the first time protects the retraction spring, which is the part most likely to fail if you rush it.
- Unpack and inventory. Confirm you have the base, pole, top clamp, stabilizing feet, and case before you start. Missing a foot or a pole segment mid-assembly wastes time you don’t have on move-in day.
- Set the base on flat ground. Extend the stabilizing feet fully before you touch the graphic. A wobbly base is the number one cause of a banner tipping later.
- Assemble the pole. Bungee-corded poles snap together section by section; telescoping poles slide and lock. Either way, seat the pole firmly into the base socket.
- Pull the banner up slowly. Assembly follows a consistent pattern: insert the pole, pull the graphic up in one smooth motion, then tilt the top clamp bar to lock it in place. Jerky pulls stress the retraction spring and shortens its life.
- Check alignment and stability. Stand back and look at the graphic from a normal viewing distance. Confirm the base sits flat, the pole is vertical, and no edge is fraying or loose.
Most retractable stands assemble in one to two minutes and require no tools, which makes them the fastest option on this list for last-minute booth changes. Keep in mind most are built for indoor use unless you’ve specified reinforced hardware.
Pro Tip: Practice the pull-and-clamp motion once at your office before show day. Muscle memory beats reading instructions under fluorescent convention-center lighting.
For background on how these stands are built, our guide on what a retractable banner actually is covers the mechanics in more depth.
Setting Up Banner Stands and Modular Frame Systems
X-frame stands, L-stands, and pole-and-rail systems skip the retraction mechanism entirely, which means there’s no spring to protect, but there’s more hardware to align correctly.
- Lay out every component before assembly: poles, corner connectors, feet, and the graphic panel itself.
- Attach corners evenly, one at a time, rather than forcing one side tight before starting the other. Uneven tension pulls at the seams and shows up as a ripple across the printed graphic.
- Tension the graphic gradually across all four corners instead of cranking one side down first.
- Step back and check legibility from the aisle, not just standing directly in front of the stand, following billboard design guidelines to ensure font size and contrast meet visibility standards. Text that reads fine up close can disappear from ten feet away under show-floor lighting.
- Stabilize the base with the feet provided, and add sandbags or counterweights if the venue has any airflow from HVAC vents or foot traffic near your booth.
Getting the corner tension even on the first pass matters more than people expect. If you’re unsure which frame style fits your space, our comparison of banner stand options for different exhibit footprints walks through the tradeoffs. Our own assembly walkthrough for retractable stands also applies many of the same alignment principles to modular frames.
Assembling a Tension Fabric or Pop-Up Display
A 10-foot stretch fabric display has more individual parts than a retractable banner, but the assembly logic is simple once the frame is square.
- Sort and identify frame pieces. Tension-fabric kits use labeled tubes and connectors. Lay them out by label before connecting anything.
- Build the frame with two people for anything larger than a tabletop unit. A single installer working alone on a 10-foot frame often twists a connector trying to hold both ends steady, which is the most common assembly mistake on these systems.
- Install the fabric graphic. Whether it’s an SEG (silicone edge graphic) channel or a full sleeve, work the fabric on evenly around the perimeter rather than pulling one corner fully tight first.
- Tension incrementally. Even edge tension across the frame produces a cleaner result than forcing the fabric into place in one spot. Move around the frame in small adjustments rather than committing to one side.
- Join multiple frames and manage cables. If you’re linking sections into a larger backwall, hide seams at the connector points and route any lighting or AV cables along the backside before the final push-fit.
Pro Tip: Photograph the assembled frame from the front before you leave the office. If a panel shifts in transit, you’ll have a reference for exactly how it should look on re-assembly.
Arrowhead’s 10 ft stretch fabric display uses this same tool-free connector system, which is worth checking if you’re comparing frame options before your next event.
What Should Be On Your Pre-Show Checklist?
The checklist matters as much as the assembly steps. Most on-floor delays trace back to something left off a packing list, not a hardware failure.
- Bring approved final drawings, a printed packing list, spare fasteners, a basic tool bag (hex keys, a small screwdriver), cleaning supplies, and QA photos of the assembled display from your last event.
- Decide early whether freight goes to an advance warehouse or ships direct-to-site. A solid pre-show checklist accounts for exhibitor manual deadlines and this warehouse-versus-direct decision, since missing the advance-warehouse cutoff usually means higher drayage costs and less setup buffer.
- Size your crew to your booth. A 10x10 booth typically needs one to three people; a 10x20 needs two to four. Larger custom builds generally require professional installation and dismantle labor, and a 10x10 inline setup commonly takes five to seven hours for a small team, so don’t schedule move-in for the same morning as your first booth appointment.
- Check the exhibitor manual for union labor rules on rigging or power hookups, and order any required labor well before show week.
How Do You Retract, Clean, and Pack a Banner Without Damaging It?
Retraction is where most spring damage happens, and it’s entirely avoidable with the right hand position.
- Hold the top clamp bar with one hand as you release it, and guide the banner down slowly. Letting it snap back into the base unsupported is the fastest way to wear out the retraction mechanism.
- Dust the graphic with a soft, lint-free cloth or feather duster before every pack-up. For actual stains, use a damp cloth with mild soap and let the graphic dry completely before retracting it since sealing in moisture invites mold on the print surface.
- Store banners upright in a cool, dry spot rather than laying them flat or stacking cases.
- A small kit of spare fasteners, cable ties, a universal hex key set, and extra clamps prevents most repeat delays and costs very little to assemble once.
Our guide on preventing common retractable stand failures goes deeper into which mechanical issues to watch for as a stand ages.
Fixing Common Problems On the Show Floor
Most on-floor problems have a fast fix, as long as you know which ones you can solve yourself and which ones need to stop immediately.
- A banner snags while retracting. Stop pulling. Forcing a stuck banner usually tears the graphic or bends the top clamp. Gently reverse the motion and check for a twisted pole or pinched fabric edge before trying again.
- The graphic hangs crooked. Partially detach the top clamp, re-center the fabric, and re-tension evenly rather than yanking one side to compensate.
- The base feels unstable. Reposition the base on flatter ground first. If that’s not possible, add a sandbag to the low corner or use zip ties to anchor the stand to adjacent furniture.
- Anything involving overhead rigging or truss attachment. Stop and call venue-approved labor. Exhibitor staff generally shouldn’t attempt hanging structures themselves.
Securing Banners to Walls, Ceilings, and Truss Systems Indoors
Freestanding stands cover most booths, but larger displays sometimes need to attach directly to a pipe-and-drape wall, a hard wall panel, or an overhead truss. Each surface calls for a different approach, and getting this wrong risks both the graphic and the venue’s structure.
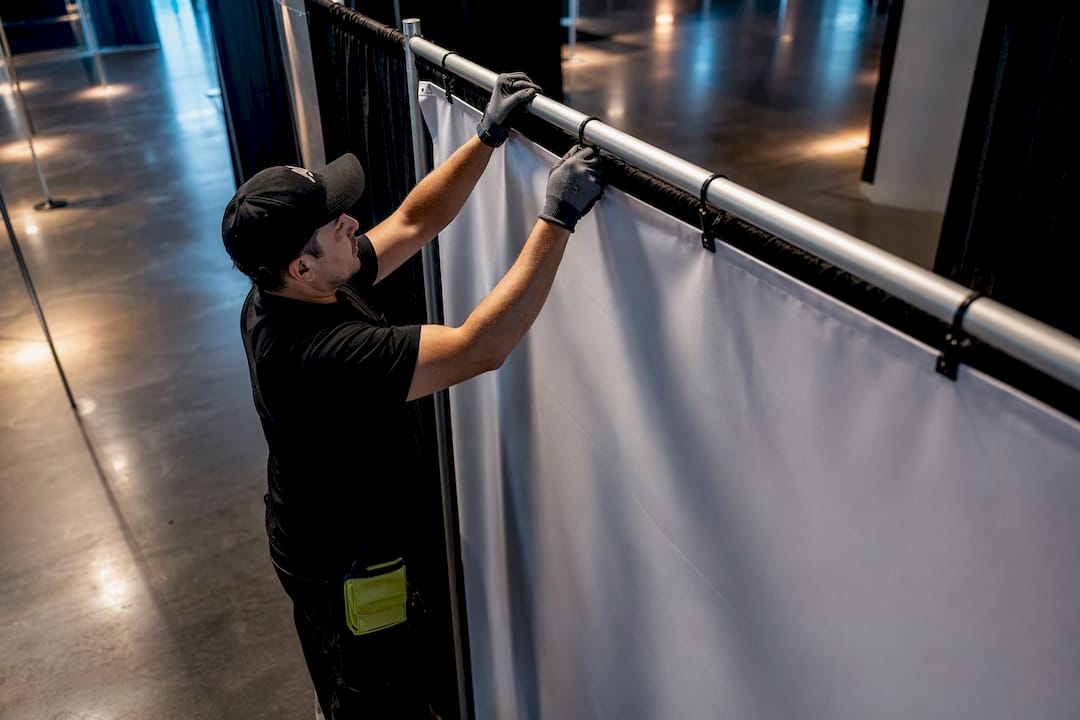
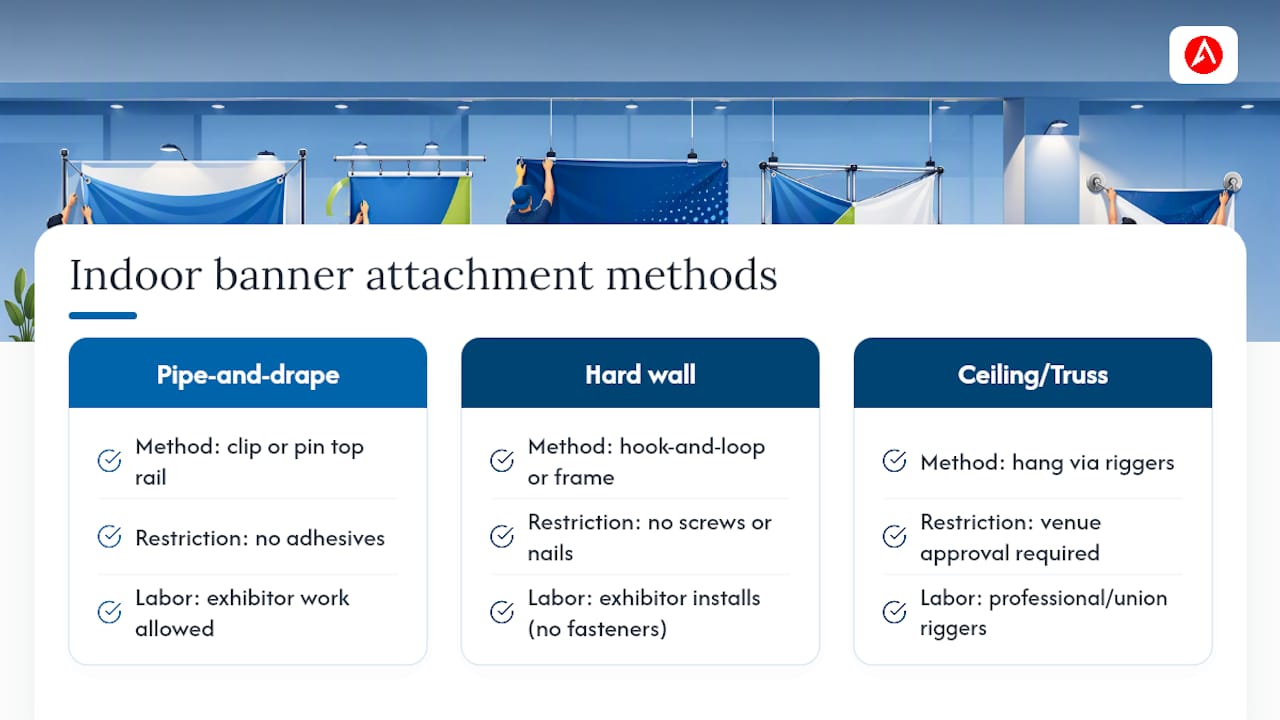
For soft pipe-and-drape walls, most venues allow banners to be clipped or pinned along the top rail using the drape hardware already in place. Avoid adhesive products on drape fabric since they often leave residue the venue will charge you for.
Hard walls, whether laminate panels or a rented backwall, typically require hook-and-loop strips or a frame system designed to sit against a flat surface rather than fasteners driven into the panel itself. Most convention centers prohibit screws or nails into rented wall sections outright.
Ceiling and truss attachments are a different category entirely. Any hanging or rigging work generally falls to professional installation and dismantle labor or in-house union riggers, not exhibitor staff, and most venues require signed engineering approval for anything suspended overhead. If your display plan includes a hanging sign or truss-mounted banner, order that labor through the exhibitor manual well ahead of show week. It’s not a step you improvise on-site.
Pro Tip: Confirm your venue’s wall and rigging policy before you design your booth graphics. A banner sized for wall mounting won’t work if the venue only allows freestanding hardware.
Safety Precautions and Protective Gear During Setup
Banner assembly looks low-risk compared to full truss builds, but a few precautions prevent the injuries that actually happen during move-in.
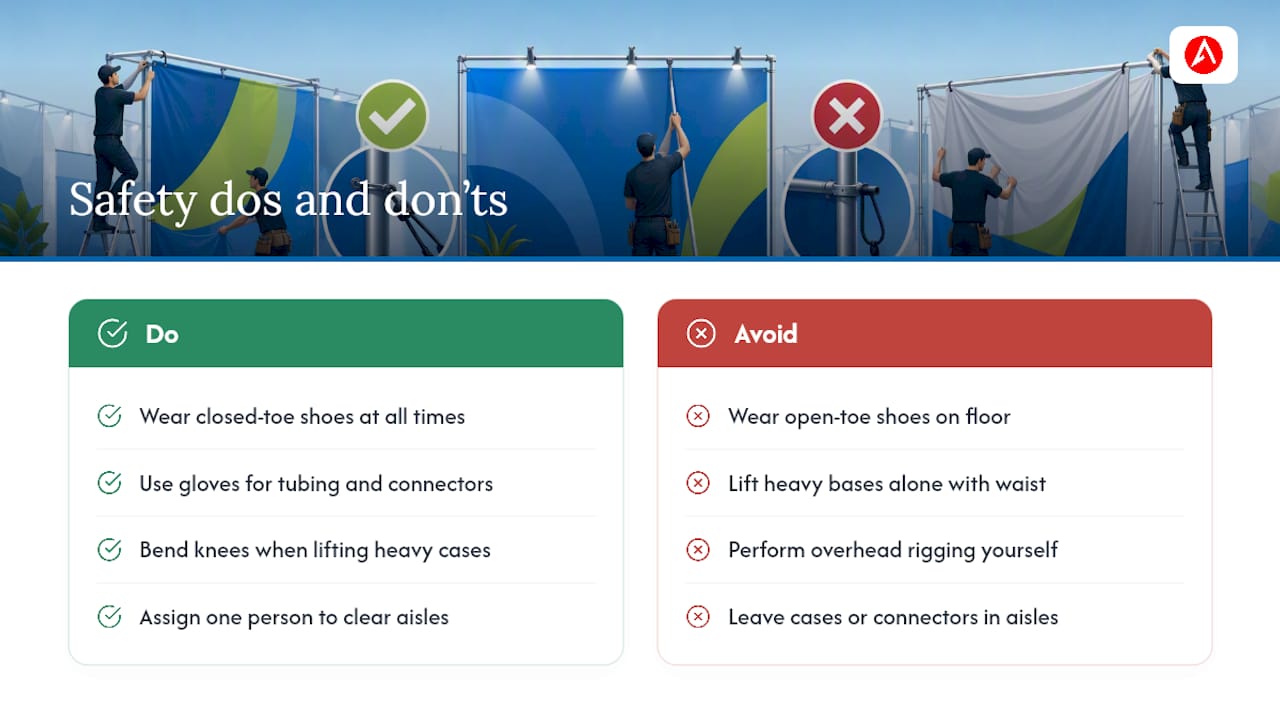
Closed-toe shoes are non-negotiable on any show floor. Crates, dollies, and dropped hardware are common, and open shoes turn a minor mishap into a real injury. Gloves help when handling frame tubing or metal connectors, especially on tension-fabric systems where pinched fingers at the joints are a frequent complaint.
Watch your back when lifting bases and cases. Retractable banner bases and stretch fabric frame cases are heavier than they look, and bending at the knees instead of the waist matters more over a ten-hour move-in day than it does for a single lift.
If your booth involves any overhead work, that’s the point where personal protective equipment escalates. Hard hats and harnesses belong to riggers working truss and ceiling attachments, which is one more reason that work stays with venue-approved labor rather than exhibitor staff.
Keep your workspace clear as you assemble. A cluttered aisle around your booth during move-in is how a colleague trips over an open case or a stray connector piece. Assign one team member to keep packing materials staged out of the walkway while others assemble the display.
Transporting Assembled and Disassembled Banners Safely
Getting a display to the venue intact starts well before load-in. Retractable banners travel in their molded carrying cases, and the case is doing real structural work. Never transport a retractable stand loose in a vehicle trunk without the case zipped and latched, since even a short drive with hard braking can bend a pole or crack a base.
For banner stands and tension-fabric frames, disassemble fully for any drive longer than a few minutes. Frame tubes packed loose in a case travel far better than an assembled frame wedged into a car, where flexing and vibration stress the connectors over distance.
If you’re shipping rather than driving, labeling every crate and keeping a single digital reference of what’s inside each one saves real time at move-in, especially if a drayage crew unfamiliar with your booth is unloading. A QR code taped to the case linking to a simple assembly photo works better than a written manual buried inside the crate.
Once you’re on-site, move assembled displays on a cart rather than carrying them by hand across the show floor. Aisles get crowded fast during move-in, and a dropped frame is an easy way to crack a connector minutes before doors open.
What Arrowhead Sign Company Sees Exhibitors Get Wrong
Most of the assembly mistakes we hear about come down to two things: rushing the retraction pull, and leaving spare fasteners at the office. Our most requested replacement parts are clamps and hex keys, both small enough to forget and both capable of stalling a setup for twenty minutes if you don’t have a spare.
Some companies build retractable banners, banner stands, and tension-fabric displays with fast fulfillment in mind, aiming to ship most products within two business days. That timeline matters most when a client finds a hardware issue during a final pre-show check and needs a replacement fast, not next week.
— Dan
Get Your Display Assembled Right, the First Time
If you’d rather not troubleshoot a stuck clamp an hour before doors open, the fix starts with hardware built for repeatable, tool-free setup. Some providers ship products quickly and offer delivery services to venues locally, which can reduce freight handling and allow more focus on booth setup.

Our banner stands and 10 ft stretch fabric display both use the connector systems covered above, and our printed banners category includes a standard banner layout service for $35 plus optional Next Day Air shipping for $10 when you’re working against a tight deadline. If you need an outdoor-capable option, the outdoor banner frame holds up where standard indoor stands won’t, and the Signicade A-frame sidewalk sign works well for directing foot traffic at the entrance. Browse our trade show products and displays or contact us for a quote on your next event.
Sources
- How to assemble a banner | Canva Help Center
- Your pre-show installation checklist for a smooth trade-show move-in | AllExhibit
- Ultimate Booth Setup Walkthrough | ExhibitionsVoice Blog
FAQ
How long does it take to set up a retractable banner?
Most retractable banner stands assemble in one to two minutes and require no tools, making them the fastest of the three main display types.
Can I install a trade show display myself?
Yes, for most retractable banners, banner stands, and modular tension-fabric displays. Larger custom island builds or any ceiling and truss attachment generally require professional installation and dismantle labor or venue-approved union riggers.
How do I retract a banner without damaging the spring?
Hold the top clamp bar and guide it down slowly rather than letting it snap back into the base unsupported, which is the main cause of spring wear over repeated use.
What should be in my trade show move-in kit?
Pack approved final drawings, a printed packing list, spare fasteners, a basic hex key set, cleaning supplies, and QA photos from your last assembled event as a reference.
How much does a banner stand cost from Arrowhead Sign Company?
Current pricing for banner stands, stretch fabric displays, and outdoor frames is listed on each product page at Arrowheadsigncompany, with a standard printed banner layout available for $35.