

How Event Signage Is Installed: A Practical Guide
Posted by Deeder Dandenhorf on Jul 2nd 2026
How Event Signage Is Installed: A Practical Guide
Event signage installation is the coordinated process of assembling, mounting, and positioning signs and displays at a venue using appropriate hardware, sequencing, and compliance with venue rules. How event signage is installed determines whether your booth attracts attention or creates chaos on setup day. Production timelines, mounting methods, and venue restrictions all shape the outcome. Arrowhead Sign Company - Signs, Banners and Trade Show Displays works with exhibitors and event organizers across Arizona to make this process predictable and professional, from print production through final placement.
How event signage is installed: the step-by-step sequence
The order of installation operations is as important as the installation itself. Proper sequence protects your signage from damage and makes efficient use of limited setup time. Skipping steps or working out of order creates bottlenecks that ripple through your entire event setup.
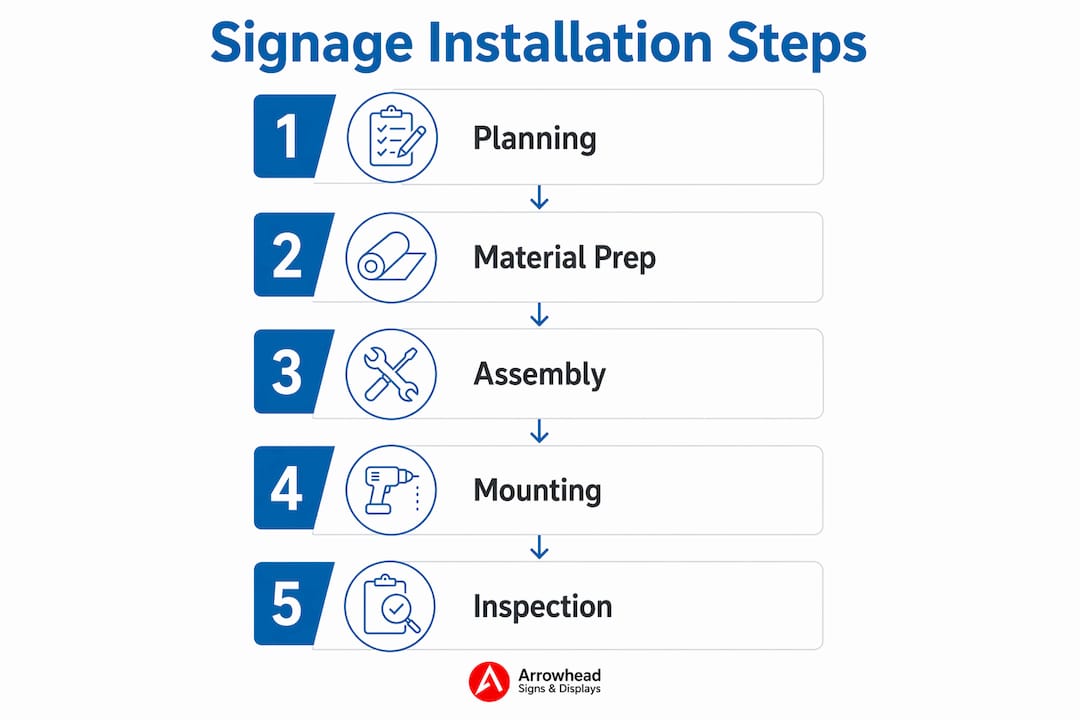
A reliable installation sequence follows this order:
- Conduct a site walkthrough. Walk the venue before any signage arrives. Identify ceiling heights, power outlet locations, loading dock access, and any restrictions on adhesives or drilling. This step catches problems before they become expensive.
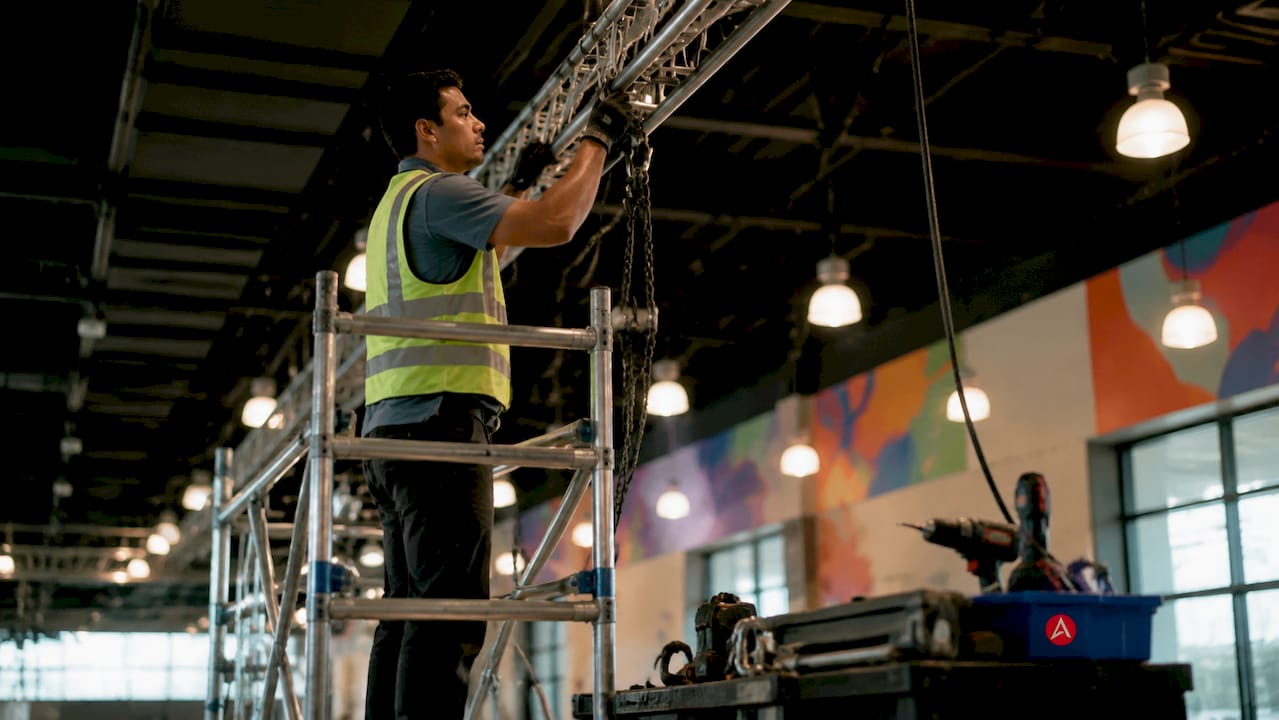
- Confirm overhead rigging first. Overhead banners and rigging must go up before floor booth construction begins. Installing ceiling elements after floor displays are in place creates access problems and risks damaging finished work.
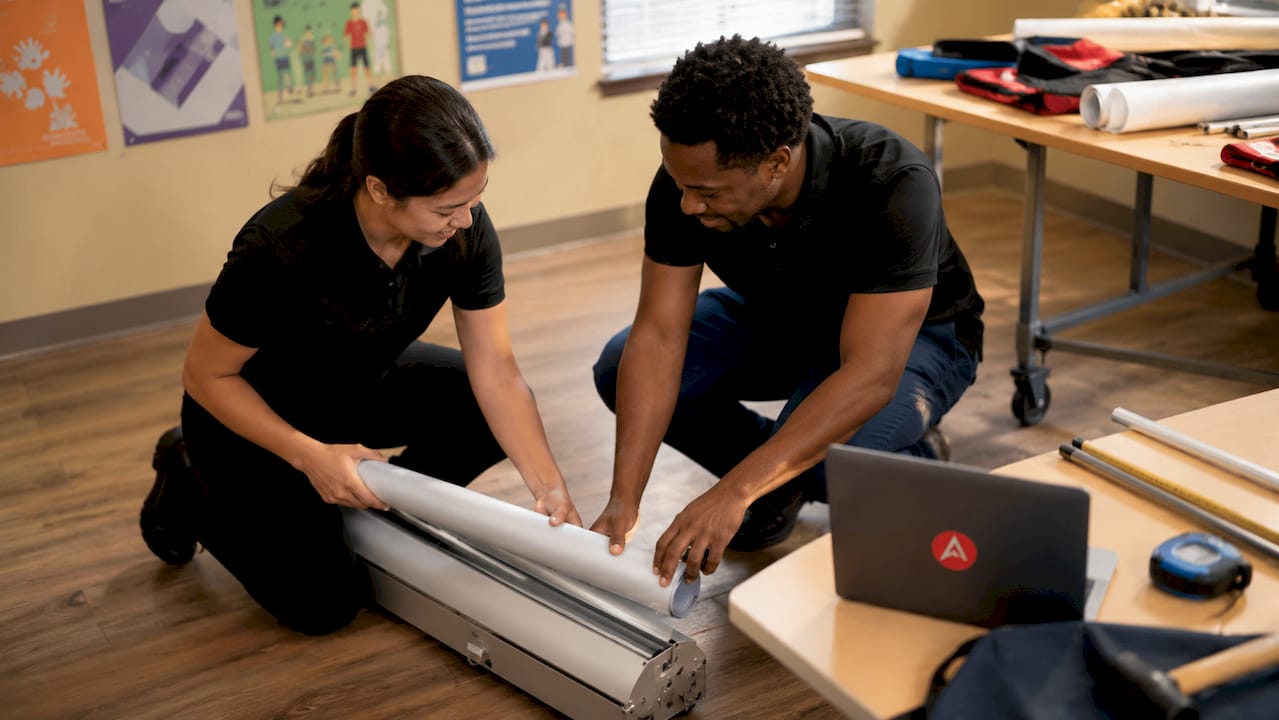
- Assemble large structural displays. Tension fabric frames, backdrop systems, and large panel walls go up next. These anchor the visual layout of your space and define the footprint for everything else.
- Install wall-mounted and panel graphics. Apply panels before furniture or counters are placed. Furniture blocks access to lower wall sections and makes alignment much harder.
- Set up portable and freestanding displays. Retractable banners and A-frame signs come last. They are easy to reposition and should be placed only after the fixed elements define the space.
- Test digital signage and lighting. Power up screens, verify content playback, and confirm lighting angles before the venue opens to attendees.
Retractable banners and tension frame fabric systems typically assemble in 15–30 minutes with two people. Large wall installations require professional installers and specialized equipment, so budget crew time accordingly.
Pro Tip: Do a dry run at your warehouse or office before the event. Assemble every display once in a controlled environment to catch missing hardware, damaged prints, or confusing instructions before setup day.
What materials and mounting hardware do you need?
The right materials depend on your venue type, display size, and how long the installation needs to hold. Choosing the wrong substrate or mounting method causes failures that are difficult to fix onsite.
Common substrates:
- Vinyl banners: Flexible, lightweight, and weather-resistant. Ideal for outdoor frames and indoor hanging applications. Grommets allow easy attachment to banner frames or rigging cables.
- Tension fabric: Wraps around aluminum frames and creates a smooth, wrinkle-free graphic surface. Used for backdrops, pop-up displays, and large exhibit walls.
- Rigid panels: Foam board, corrugated plastic, and aluminum composite panels work for directional signs, table signs, and mounted graphics. Heavier and less portable than fabric options.
- Adhesive-backed vinyl: Applied directly to walls, floors, or windows. Requires a smooth, clean surface and venue permission.
Mounting hardware categories:
- Banner stands: Retractable stands, X-stands, and telescoping pole systems. Most are tool-free and set up in under 30 minutes.
- Rigging cables and clamps: Used for overhead hanging banners. Venues often require certified riggers for these installations due to safety and liability concerns.
- Adhesive options: Double-sided tape, removable adhesive strips, and hook-and-loop fasteners. Always confirm with the venue which adhesives are permitted before ordering.
- Frame systems: Adjustable aluminum frames for outdoor banners provide stability in wind and are reusable across multiple events.
ADA compliance requires mounting heights that keep signage readable and pathways clear. Overhead banners must clear minimum height thresholds, and floor signs cannot obstruct accessible routes. Check venue-specific requirements and local building codes before finalizing your mounting plan.
Pro Tip: For outdoor event signage, always use weighted bases or ground stakes on banner frames. Wind loads on large-format graphics are significant, and an unsecured display becomes a safety hazard.
How do venue rules affect your signage setup?
Venue restrictions are the most common source of last-minute installation problems. Site walkthroughs identify constraints like bans on adhesives, mounting restrictions, and corridor placement rules that could cause permit issues or safety hazards. Discovering these restrictions on setup day leaves you with no good options.
Common venue restrictions include:
- No drilling or permanent fasteners. Most convention centers and hotel ballrooms prohibit any modification to walls, floors, or ceilings. Plan for freestanding or tension-mounted systems instead.
- Adhesive restrictions. Many venues ban certain tapes or require specific removable adhesives. Residue from unapproved tape can result in damage fees.
- Rigging certification requirements. Venues frequently require certified riggers for any overhead installation. Hiring an uncertified crew for this work creates liability exposure and may result in the installation being rejected.
- Fire code clearances. Signage cannot block emergency exits, sprinkler heads, or fire extinguisher access points. Floor plans must account for these clearances from the start.
- Power and WiFi limitations. Convention center WiFi is often unreliable or expensive. Experienced professionals load digital content locally on media players or USB drives to avoid dependence on venue internet.
Environmental factors add another layer of complexity for outdoor events. Wind, rain, and direct sunlight affect both material choice and mounting method. UV-resistant inks and weatherproof substrates extend the life of outdoor displays. For guidance on indoor vs. outdoor options, material selection is the first decision that shapes every installation choice that follows.
Pro Tip: Request the venue’s exhibitor manual at least four weeks before your event. This document lists every restriction, approved vendor, and permit requirement. Reading it early prevents costly surprises.
What logistical strategies make event signage setup more efficient?
Logistical preparation separates a smooth setup from a stressful one. Kitting organizes signage, hardware, and instructions into logical sets, preventing time-consuming onsite sorting and setup mistakes. This practice is often overlooked, but it is one of the highest-impact things you can do before an event.
Effective kitting means grouping every item needed for a specific location into one labeled box or bag. The registration desk kit contains the registration backdrop, its frame hardware, the assembly instructions, and the cable ties. Nothing is loose. Nothing requires hunting through a pile of boxes. The installer picks up the kit and works through it in sequence.
Beyond kitting, these strategies consistently reduce setup time and errors:
- Label everything by location and sequence. Mark each package with the room name, installation order, and a brief description. “Main Stage Backdrop, Install First” is more useful than a generic product name.
- Check design files before printing. Inconsistent artwork standards such as missing bleeds or wrong color modes cause costly reprints and onsite delays. File quality control happens before the print run, not after.
- Build in contingency time. Plan for at least one unexpected problem per event. A damaged print, a missing hardware piece, or a venue access delay is normal. Buffer time in your schedule absorbs these without derailing the whole setup.
- Document your installation plan. A one-page diagram showing where each display goes, at what height, and in what order gives every crew member a shared reference. It also speeds up teardown.
Complex fabrications and large-format structural pieces need at least six weeks of lead time for design approvals and quality checks. Simpler items require a minimum of two weeks. Rush production typically adds 50–100% above standard rates plus expedited shipping costs. Planning your production timeline is as important as planning your installation sequence.
Pro Tip: For quick turnaround situations, confirm your printer’s ship date and build your installation schedule backward from that date. Never assume a print will arrive on time without a confirmed tracking number.
Key Takeaways
Proper event signage installation requires sequencing, compliance, and preparation working together from the first design file to the final display placement.
| Point | Details |
|---|---|
| Sequence is non-negotiable | Overhead rigging must precede floor setup; panels go up before furniture to protect access and alignment. |
| Venue rules shape every decision | Confirm adhesive, drilling, and rigging restrictions at least four weeks before your event to avoid fines or delays. |
| Kitting cuts setup time | Organize signage and hardware by location and installation order before the event to prevent onsite sorting chaos. |
| File quality determines print quality | Correct bleeds, color modes, and resolution before printing to avoid costly reprints and last-minute delays. |
| Lead time protects your budget | Complex displays need six weeks minimum; rush production adds 50–100% to standard costs. |
What I’ve learned from watching signage setups go wrong
The most common mistake I see is treating installation as an afterthought. Exhibitors spend weeks on graphic design and minutes on installation planning. Then setup day arrives and the crew is standing in a convention center hallway trying to read assembly instructions for the first time while the clock runs down.
Venue restrictions catch people off guard more than anything else. A beautiful overhead banner becomes useless if the venue requires a certified rigger and you didn’t budget for one. A wall graphic becomes a liability if the adhesive you chose leaves residue on a painted surface. These are not rare edge cases. They happen at nearly every large event to someone who didn’t read the exhibitor manual early enough.
The dry run is the single most underused practice in event signage setup. Assembling your displays once before the event takes a few hours. It reveals missing hardware, confusing instructions, and damaged prints while you still have time to fix them. Skipping it to save time almost always costs more time on setup day.
Professional installers are worth the cost for complex setups. Tension fabric walls, overhead rigging, and large modular systems require experience and the right tools. Sending an untrained crew to handle these installations creates safety risks and often results in damaged displays. Know which elements require professional handling and budget for it from the start.
The exhibitors who have the smoothest setups are the ones who treat installation planning with the same seriousness as graphic design. They kit their displays, confirm venue rules early, do a dry run, and build contingency time into their schedule. The signage looks great because the process behind it was solid.
— Dan
Arrowhead Sign Company - Signs, Banners and Trade Show Displays: ready when you are
Getting your signage produced, kitted, and delivered on time is half the battle. Arrowhead Sign Company - Signs, Banners and Trade Show Displays ships most products within two business days and delivers directly to venues across Arizona, so your displays arrive ready to install.
From retractable banner stands to tension fabric backdrops and outdoor banner frames, Arrowhead Sign Company - Signs, Banners and Trade Show Displays carries the full range of display systems covered in this guide. Every product ships with assembly instructions, and the team is available to answer installation questions before your event. If you need a 10 ft stretch fabric display for your next trade show, Arrowhead Sign Company - Signs, Banners and Trade Show Displays has you covered with fast production and reliable delivery.
FAQ
How long does event signage installation typically take?
Retractable banners and tension fabric systems assemble in 15–30 minutes with two people. Large wall installations and overhead rigging require professional crews and several hours depending on scale.
Do venues allow any type of mounting hardware?
Most convention centers and hotel venues prohibit drilling and restrict certain adhesives. Always request the venue’s exhibitor manual and confirm approved mounting methods before ordering hardware.
When should I order event signage to avoid rush fees?
Complex fabrications need at least six weeks of lead time. Simpler displays require a minimum of two weeks. Rush production adds 50–100% above standard rates plus expedited shipping costs.
What is kitting and why does it matter for signage setup?
Kitting means organizing each display’s graphics, hardware, and instructions into one labeled package by location and installation order. It prevents onsite sorting delays and reduces setup errors significantly.
How do I handle digital signage at venues with unreliable WiFi?
Load all digital content onto a local media player or USB drive before the event. Convention center WiFi is frequently unreliable or expensive, and pre-loaded content plays without an internet connection.