

Break Even by 3–4 Shows: Best Trade Show Displays for Exhibitors
Posted by Deeder Dandenhorf on Sep 4th 2026
Break Even by 3–4 Shows: Best Trade Show Displays for Exhibitors
Start with the display type that matches your show frequency, not the one that photographs best. First-timers and occasional exhibitors do well with portable or tension fabric setups; teams hitting three or more shows a year should look at modular kits; anyone with a live demo needs enough depth to support it; and large footprints call for custom or rental builds. Budgets, materials, and setup logistics all follow from that first decision.
TL;DR:
- Portable and tension fabric displays are ideal for first-time exhibitors and small booths due to their low cost, light weight, and quick setup.
- Modular systems offer flexibility for companies doing multiple shows per year, allowing reconfiguration between 10x10 and 10x20 footprints at mid-five-figure budgets.
- Renting is suitable for one-off or testing markets, but buying becomes more economical after three to four shows, considering setup and material costs.
- Material choices like dye-sublimated fabric, aluminum frames, and eco-friendly options impact weight, shipping, and appearance, with premium finishes requiring careful proofing.
- Staff comfort items, especially lighting and anti-fatigue mats, deliver higher return on investment for booth impact and visitor engagement than expensive materials or finishes.
Table of Contents
- Best Trade Show Displays at a Glance
- Which Display Type Actually Fits Your Show Schedule?
- Materials and Finishes That Change the Price and the Look
- What Trade Show Displays Really Cost by Footprint
- How Booth Size Should Drive Your Display Choice
- Accessories and a Pre-Show Setup Checklist
- How to Choose the Right Vendor and Kit
- Arrowhead Sign Company’s Approach to Trade Show Displays
- Why the Screening Order Matters More Than the Product
- Ready to Order Your Next Show Display?
- Sources
- FAQ
Best Trade Show Displays at a Glance
Before you compare specs, match your situation to a category. Here’s the fast version of what each display type is built for, plus where the two footprint standards (10x10 vs 10x20) and larger island spaces change the calculation.
- Portable and tension fabric displays: Best for first-time exhibitors, small booths, and anyone who needs something to check as luggage or ship overnight. Portable/tension fabric systems are usually the smartest first purchase because they balance visual presence, ease of transport, and cost.
- Modular kits: Best for exhibitors doing three or more shows a year who want a booth that can shrink to a 10x10 or grow to a 10x20 using the same components.
- Rental systems: Best for a single show, an unfamiliar market, or a company testing whether a category of trade show even deserves a recurring budget.
- Custom builds: Best for island spaces, flagship shows, and brands whose booth doubles as a marketing statement.
- Basic accessories (lighting, counters, flooring): Not a category on their own, but they decide whether any of the above actually performs on the show floor.
For a 10x10, a single tension fabric backwall or a compact modular kit covers most needs. A 10x20 usually calls for a modular system you can divide into a greeting zone and a demo zone. Islands are where custom builds and rentals dominate, since open sightlines change everything about how a display gets built.
If your immediate need is outdoor promotion rather than an indoor booth, three practical products cover common gaps: a 10 ft stretch fabric display for a 10x10 backwall, an Outdoor Banner Frame for outdoor events, and a Signicade Deluxe A-Frame Sidewalk Sign for wayfinding and sidewalk promotion.
Which Display Type Actually Fits Your Show Schedule?
Choosing among the best trade show displays comes down to five categories, each with its own math on cost, labor, and durability. Here’s how they break down in practice.
-
Portable and tension fabric displays. These include pop-up frames with fabric or vinyl graphics, retractable banner stands, and stretch fabric backwalls. They typically pack into one or two cases, set up in under 30 minutes with no tools, and travel as checked luggage for smaller pieces. Full 10x10 setups in this category commonly run several thousand dollars all in, while a single stretch fabric backwall or banner stand can start well under $1,000. The tradeoff is limited depth for product demos and a graphic that needs refreshing every couple of years as messaging changes.
-
Modular kits. Built from aluminum extrusion frames with interchangeable fabric or rigid panels, modular systems let you reconfigure the same components into a 10x10 one month and a 10x20 the next. Setup takes a two-person crew an hour or two, longer with lightboxes or monitor mounts involved. Budgets scale from mid four figures for a compact kit into five figures for larger configurations with backlit elements. Modular is the sweet spot for exhibitors doing recurring regional shows who need flexibility without paying custom-build prices every time.
-
Rental systems. Renting sidesteps the biggest modular and custom drawback: storage between shows. Rental typically costs about a third of what an equivalent purchase would run for a single show, which makes it the rational choice for a one-off appearance or a market you’re still testing. The catch is availability windows and less control over exact finishes, since you’re working from a rental house’s inventory rather than a custom spec.
-
Custom builds. Reserved for island spaces and flagship events where the booth itself is part of the brand statement. Costs range from high five figures into six figures depending on scale, and production timelines run 6 to 12-plus weeks, plus separate rigging lead times if hanging signage is involved. Custom makes sense once a show becomes a genuine annual anchor for the business, not before.
-
Accessories as a category unto themselves. Lighting, counters, monitor mounts, and flooring aren’t a display type, but they decide whether any of the above four actually reads well from the aisle. A great backwall under bad lighting photographs worse than a modest one lit correctly.
Pro Tip: If you’re not sure which category fits, answer three questions first: how many shows in the next 12 months, how many staff you’ll need at peak traffic, and whether your footprint needs to grow next year. Those three screens prevent most of the expensive wrong turns exhibitors make on a first purchase.
The rent-versus-buy signal is simple once you’ve picked a category: rent for one or two shows, buy once you’re confident in three or four. A regional distributor doing a single annual industry conference almost always rents. A company adding four new trade shows to next year’s calendar almost always comes out ahead buying, even with the upfront hit.
Materials and Finishes That Change the Price and the Look
Material choice affects three things at once: what the booth weighs, how it ships, and how premium it looks from ten feet away. Dye-sublimated tension fabric and SEG (silicone edge graphic) systems are the lightest options, they’re washable, and they deliver strong print fidelity without the glare of a laminated print. Aluminum extrusion remains the standard frame material for modular exhibits because it survives repeated shipping without warping.
- Tension fabric and SEG: Lightweight, packs small, forgiving of wrinkles, ideal for anything shipped rather than driven.
- Rigid substrates (Dibond, acrylic): Heavier and pricier to ship, but they deliver a crisper, more premium edge for permanent or semi-permanent installs.
- Aluminum frames: The backbone of modular systems, chosen specifically for its strength-to-weight ratio over repeated setup cycles.
- Wood accents: Add warmth and a boutique feel, common in custom builds, rarely used in portable kits because of weight.
- Eco alternatives: Recyclable aluminum and eco-composites like recycled PET or FSC-certified timber are showing up more often as shows push exhibitors toward lower-waste materials.
Backlit and LED systems deserve a separate note. SEG lightboxes require different color separations and a distinct proofing pass compared with standard reflective print, since light passing through the fabric shifts color differently than light bouncing off it. Build that extra proofing round into your timeline, not as an afterthought once the graphics come back looking washed out.
What Trade Show Displays Really Cost by Footprint
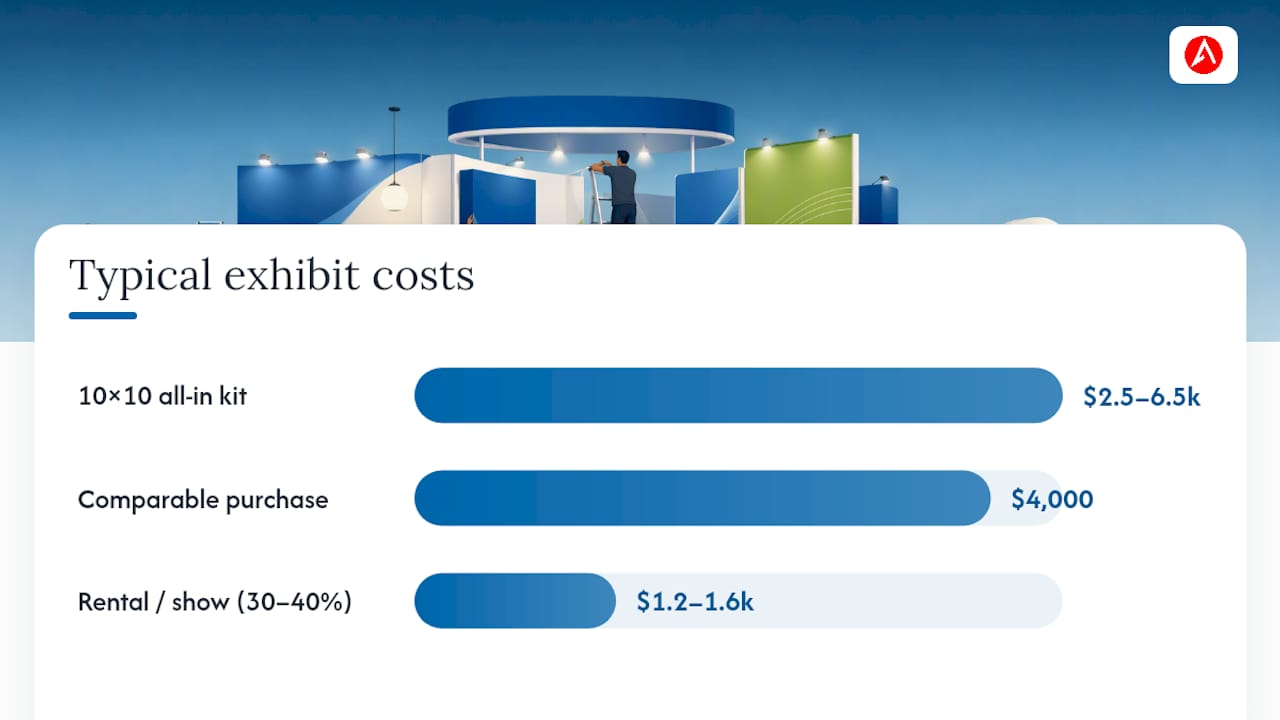
A 10x10 all-in setup, including kit, graphics, and basic accessories, commonly lands between $2,500 and $6,500. A 10x20 roughly doubles the footprint but costs significantly more, since some fixed items (counters, lighting kits) don’t scale linearly. Custom island builds move into five and six figures once labor, rigging, and material upgrades stack up.
A complete kit often allocates its single largest budget line to the backwall, which is exactly why picking the right backwall material matters more than any other single decision.
The rent-versus-buy math gets concrete once you plug in real numbers. If a comparable purchase runs $4,000 and rental costs 30 to 40 percent of that per show, you’re paying roughly $1,200 to $1,600 to rent once. Do that math against your actual show count: two rentals a year costs about the same as owning after two to three years, so most exhibitors break even on a purchase around three to four shows.
- Mix owned core components (a fabric backwall you use every show) with rented extras (a monitor mount or extra counter) for shows with unusual layout demands.
- Reuse graphics panels across multiple show cycles by keeping messaging generic and swapping only date-specific inserts.
- Negotiate drayage and labor as a package with your show’s general contractor rather than booking each separately.
How Booth Size Should Drive Your Display Choice
A 10x10 has one job: a clean backwall, a single counter, and lighting that actually reaches the graphics rather than washing out under overhead hall lights. Don’t crowd it with a demo station and a seating area. Pick one focal point and let it work.
A 10x20 gives you room to separate zones. Split it into a front greeting area, a middle demo or conversation zone, and a back storage or staff area. This is where modular kits earn their keep, since the same frame system reconfigures into distinct sections without looking pieced together.
Island booths change the visual math entirely, since visitors approach from every direction instead of one. Design multiple outward-facing points rather than a single presentation aimed at one aisle, and optimize floor-level legibility before adding hanging signage overhead.
- Follow the 3-second rule: a visitor walking past should identify who you are and what you do without stopping.
- Add hanging signage only in larger footprints, and account for its own rigging lead time separately from your booth production schedule.
- Keep storage out of sightlines in islands; a cluttered back corner undercuts an otherwise strong open design.
Accessories and a Pre-Show Setup Checklist
The display itself is maybe 60 percent of what makes a booth work. Lighting, counters, and cable management fill in the rest. Basic LED spotlight kits often run under $200 and deliver one of the highest returns of any small spend on the show floor, since correct lighting makes even a modest fabric graphic look considerably more premium.
- Confirm graphics files are approved and in production. Standard 10x10 kits typically ship 2 to 3 weeks after artwork approval, with portable pieces sometimes shipping in a few business days.
- Pack anti-fatigue mats. Standing on concrete for eight-hour show days wears out staff fast, and comfort upgrades like these directly affect energy and conversation quality late in the day.
- Route and label all cables before shipping, not on-site under time pressure.
- Confirm electrical and internet orders with the venue at least two weeks out.
- Do a full dry run of setup at your office or warehouse if this is a first-time kit.
Pro Tip: Staff comfort items compete with display upgrades for the same budget line. If money’s tight, spend on lighting first and mats second. Both beat a decorative extra nobody notices.
How to Choose the Right Vendor and Kit
Screening starts with your own show calendar, not a vendor’s catalog. Ask yourself how many shows you’re running this year, how many staff need to fit comfortably at peak traffic, whether you need a working demo station, and where the kit will live between shows. Those answers point you toward portable, modular, rental, or custom before you ever request a quote.
Once you’re talking to a vendor, ask direct questions: What’s the written production lead time, in writing, not “usually”? What warranty covers the frame versus the graphics? Does installation support come with the purchase or cost extra? Can they show you actual dimensions and weight, not just a rendering?
Red flags are easy to spot once you know what to look for: no firm lead time, vague material specs, reluctance to provide references, or pricing that excludes freight and drayage until the invoice arrives.
| Signal | Good sign | Red flag |
|---|---|---|
| Lead time | Written, specific date | “Usually a few weeks” |
| Specs | Exact dimensions and weight | Rendering only |
| Warranty | Clear frame/graphic terms | Not mentioned |
| Pricing | All-in quote | Freight added later |
Arrowhead Sign Company’s Approach to Trade Show Displays
Arrowhead Sign Company fits squarely into the buyer-first approach this guide recommends: match the product to the show schedule, not the other way around.
- Direct venue delivery removes one more logistics headache from show week.
- Retractable banners, banner stands, custom printed tents, and fabric or SEG backlit displays cover a broad range from small booths to multi-show schedules.
- The designs accommodate a range of budgets, reflected across the catalog pricing.
- Nationwide shipping extends the fulfillment advantage beyond local pickup.
For deeper reading on messaging and design choices that pair with any of these display types, see designing booth signage that wins attention and trade show display types explained for marketers.
Why the Screening Order Matters More Than the Product
Most exhibitors buy backward. They see a display that looks good in a photo, then try to justify it against their show schedule after the fact. It should run the other direction: frequency first, then demo needs, then footprint, then budget. A gorgeous custom build is a bad purchase for a company doing one trade show every eighteen months, no matter how sharp it looks in a rendering.
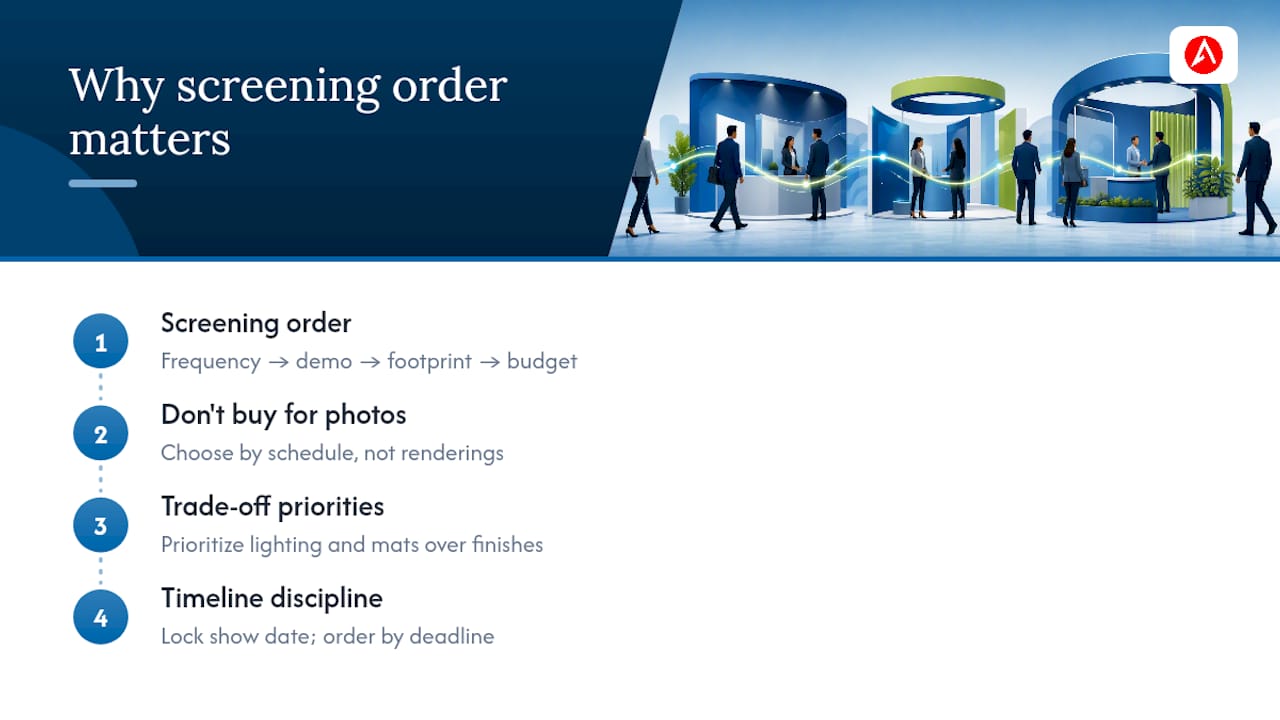
The screening order also exposes a bias worth naming directly. Exhibitors overweight the graphic and underweight the lighting and staff comfort that make that graphic actually land. A $6,000 backwall under flat overhead lighting reads worse than a $2,000 backwall with a $150 spotlight kit aimed correctly. If your budget forces a choice between one more premium material upgrade and a proper lighting kit, take the lighting every time. If it forces a choice between a fancier finish and anti-fatigue mats for an eight-hour show day, take the mats. Staff who aren’t exhausted by hour five have better conversations than any material upgrade buys you.
The other overlooked piece is timeline discipline. Exhibitors who treat production lead times as flexible end up rushing decisions on materials and finishes that deserved more thought. Lock your show date, work backward to your order-by window, and don’t let a late graphics approval turn a 2 to 3 week production job into a panic.
— Dan
Ready to Order Your Next Show Display?
You’ve got the buyer-first framework, but if you’re staring at your show calendar right now trying to decide what to order this week, three products from Arrowhead Sign Company’s catalog map directly onto the needs covered above. If you need a fast, visually strong 10x10 backwall, the 10 ft stretch fabric display delivers the lightweight, high-fidelity print quality this guide recommends for portable setups, and it ships within two business days.

For outdoor events, sidewalk promotions, or wayfinding at a venue entrance, the Outdoor Banner Frame handles wind and weather better than an indoor-grade stand. And for pointing foot traffic toward your booth or storefront during an event, a Signicade Deluxe A-Frame Sidewalk Sign covers the wayfinding gap most exhibitors forget to plan for until show week. If you want messaging help to pair with any of these, the booth tagline suggestions resource from Live Caption AI is worth a look before you finalize your graphics files.
Browse the full catalog at Arrowhead Sign Company and place your order this week to stay ahead of standard 2 to 3 week production windows for your next show.
Sources
- Trade Show Booth Displays: The Complete Buyer’s Guide | ExhibitionsVoice Blog
- How to Choose a Tradeshow Display (2026 Complete Guide) — Branding Centres · Branding Centres
- Trade Show Booth Displays: The Complete Buyer’s Guide
FAQ
What Are the Best Trade Show Displays for a First Show?
Portable or tension fabric displays are the best trade show displays for a first-time exhibitor, since they balance visual impact, easy transport, and cost, typically running under $1,000 for a single backwall or banner stand.
How Much Should I Budget for a 10x10 Trade Show Booth?
A full 10x10 setup, including kit, graphics, and basic accessories, commonly runs $2,500 to $6,500, with freight, labor, and electrical adding to that base cost depending on the show.
Should I Rent or Buy a Trade Show Display?
Rent for one or two shows a year, since rental typically costs 30 to 40 percent of a comparable purchase; buy once you’re doing three or four shows, which is roughly where ownership breaks even.
How Far in Advance Should I Order My Trade Show Display?
Order portable kits a few weeks ahead since graphics can ship in days; order standard 10x10 kits at least 3 weeks before your show; budget 6 to 12-plus weeks for custom or island builds.
What Accessories Actually Matter for a Trade Show Booth?
Lighting and staff comfort items like anti-fatigue mats matter most; a basic LED lighting kit often costs under $200 and dramatically improves how premium your display looks from the aisle.